Clash Manager
Run and batch-update clash tests, review and group results, export Excel reports and history, and create tests from a matrix.
The Clash Manager panel works on the clash tests of the open model: it runs and edits tests in bulk, exports Excel reports, keeps a history of the clashes from week to week, steps through the results of one test with the model isolated around them, groups and renames results, and builds whole sets of tests from a spreadsheet matrix. You use it after Clash Detective has been set up with at least one test, or before that to create the tests from a matrix. The panel needs Navisworks Manage: in Navisworks Simulate, which has no Clash Detective, all four buttons are greyed out with a “Navisworks Manage only” tooltip.
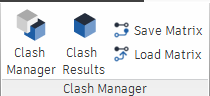
Clash Manager
Clash Manager toggles the Clash Manager dock pane (its title bar reads “Clash Detection Manager”). The pane lists every clash test of the model with its status counts, and from it you run the checked tests, change their tolerance, type or name in one go, set the status of every result of a test, select the clashed elements in the model and export the Excel reports. The pane is empty and its buttons are disabled until the model has at least one clash test.
The Clash Manager pane at a glance
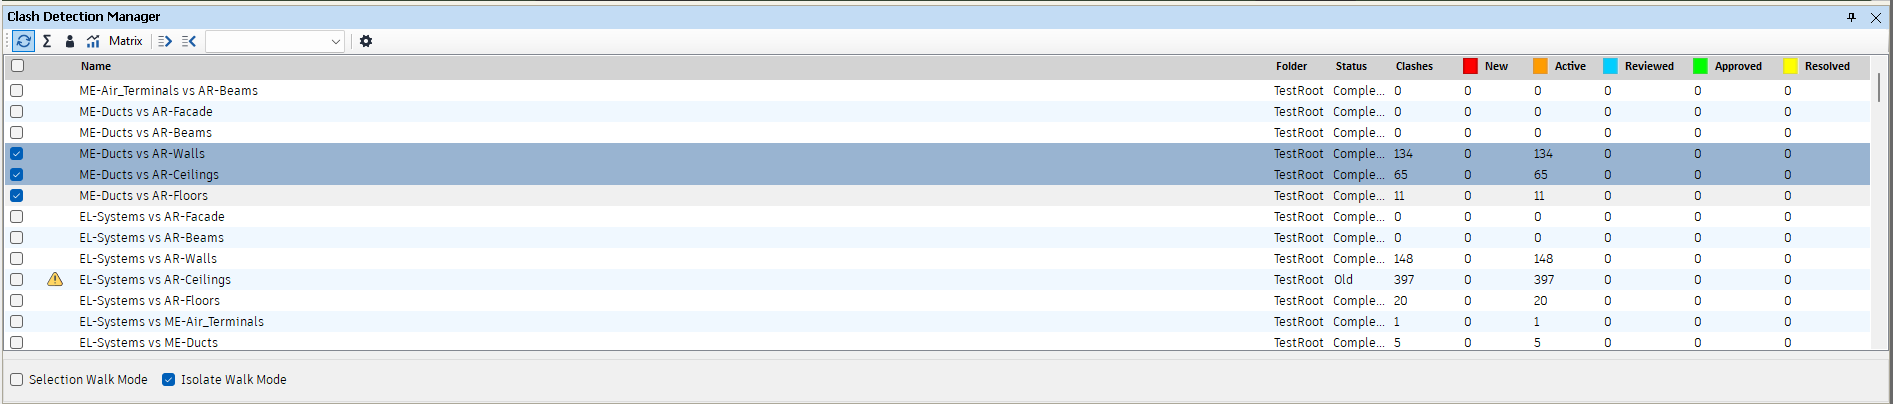
- Toolbar, left to right (icon buttons; hover for the name):
- Update selected clash tests runs every checked test, one after the other, behind a progress bar.
- Summary clash detection report exports the Standard report.
- Clash detection report with regards to assignment exports the Assigned To report.
- Detailed clash detection report exports the Detailed report.
- Matrix exports the Clash Matrix report.
- Two run-group buttons: Export currently checked clash groups to be able to later load it directly saves the checked tests as a run group, and Import previously saved check list of clash tests to run in band loads saved run groups.
- The run group drop-down lists the loaded run groups; picking one checks its tests.
- Settings opens the Settings dialog on its Clash Manager tab.
- Test list, one row per test, folders flattened:
- A check box column. The header check box checks or unchecks every test. Checked rows are highlighted; the checked tests are what the toolbar buttons and Batch Update… work on.
- A warning icon column: the icon means the test is out of date (the model changed since it was last run).
- Name, Folder (the clash test folder the test sits in, empty for the root), Status (the Navisworks run status of the test).
- Clashes, New, Active, Reviewed, Approved, Resolved: the number of results in total and per status. Whether a group counts as one clash or as its member clashes follows the Count Groups as Single Clash setting, the same rule the reports use, so the pane and the workbook show the same numbers.
- Selection Walk Mode: when ticked, clicking a row selects every element of that test’s results in the model.
- Isolate Walk Mode: when ticked, clicking a row hides everything except the elements of that test and colours them: the two sides of each clash red and green, or, with Set Colors to Status ticked in Settings, one colour per status (New red, Active orange, Reviewed light blue, Approved green, Resolved yellow).
- Right-click menu on a row:
- Select All selects every clashed element of the highlighted test in the model.
- Select By Status > New, Active, Reviewed, Approved, Resolved selects only the elements of results with that status (results inside groups included).
- Select Assigned and Select Unassigned select the elements of results with or without an assignee.
- Filter By Assigned… opens a dialog listing every assignee found in the checked tests; tick the users and press Filter to select the elements of their results.
- Set Status For All Results > New, Active, Reviewed, Approved, Resolved sets that status on every result of the highlighted test, groups included, after a confirmation that states the count.
- Batch Update… opens the Batch Update Clash Tests dialog for the checked tests.
Clicking a row’s check box only checks it; it does not isolate or select anything. The menu items that act on “the highlighted test” use the row you right-clicked, while Filter By Assigned… and Batch Update… use the checked rows.
Running tests
- Tick the tests to run, or pick a run group from the drop-down to tick them for you.
- Click Update selected clash tests.
- Wait for the progress bar; it shows the name of the test being run and can be cancelled between tests. Tests already run keep their new results.
The check boxes are cleared when the run finishes, and the counts in the list are refreshed once.
Changing several tests at once (Batch Update)
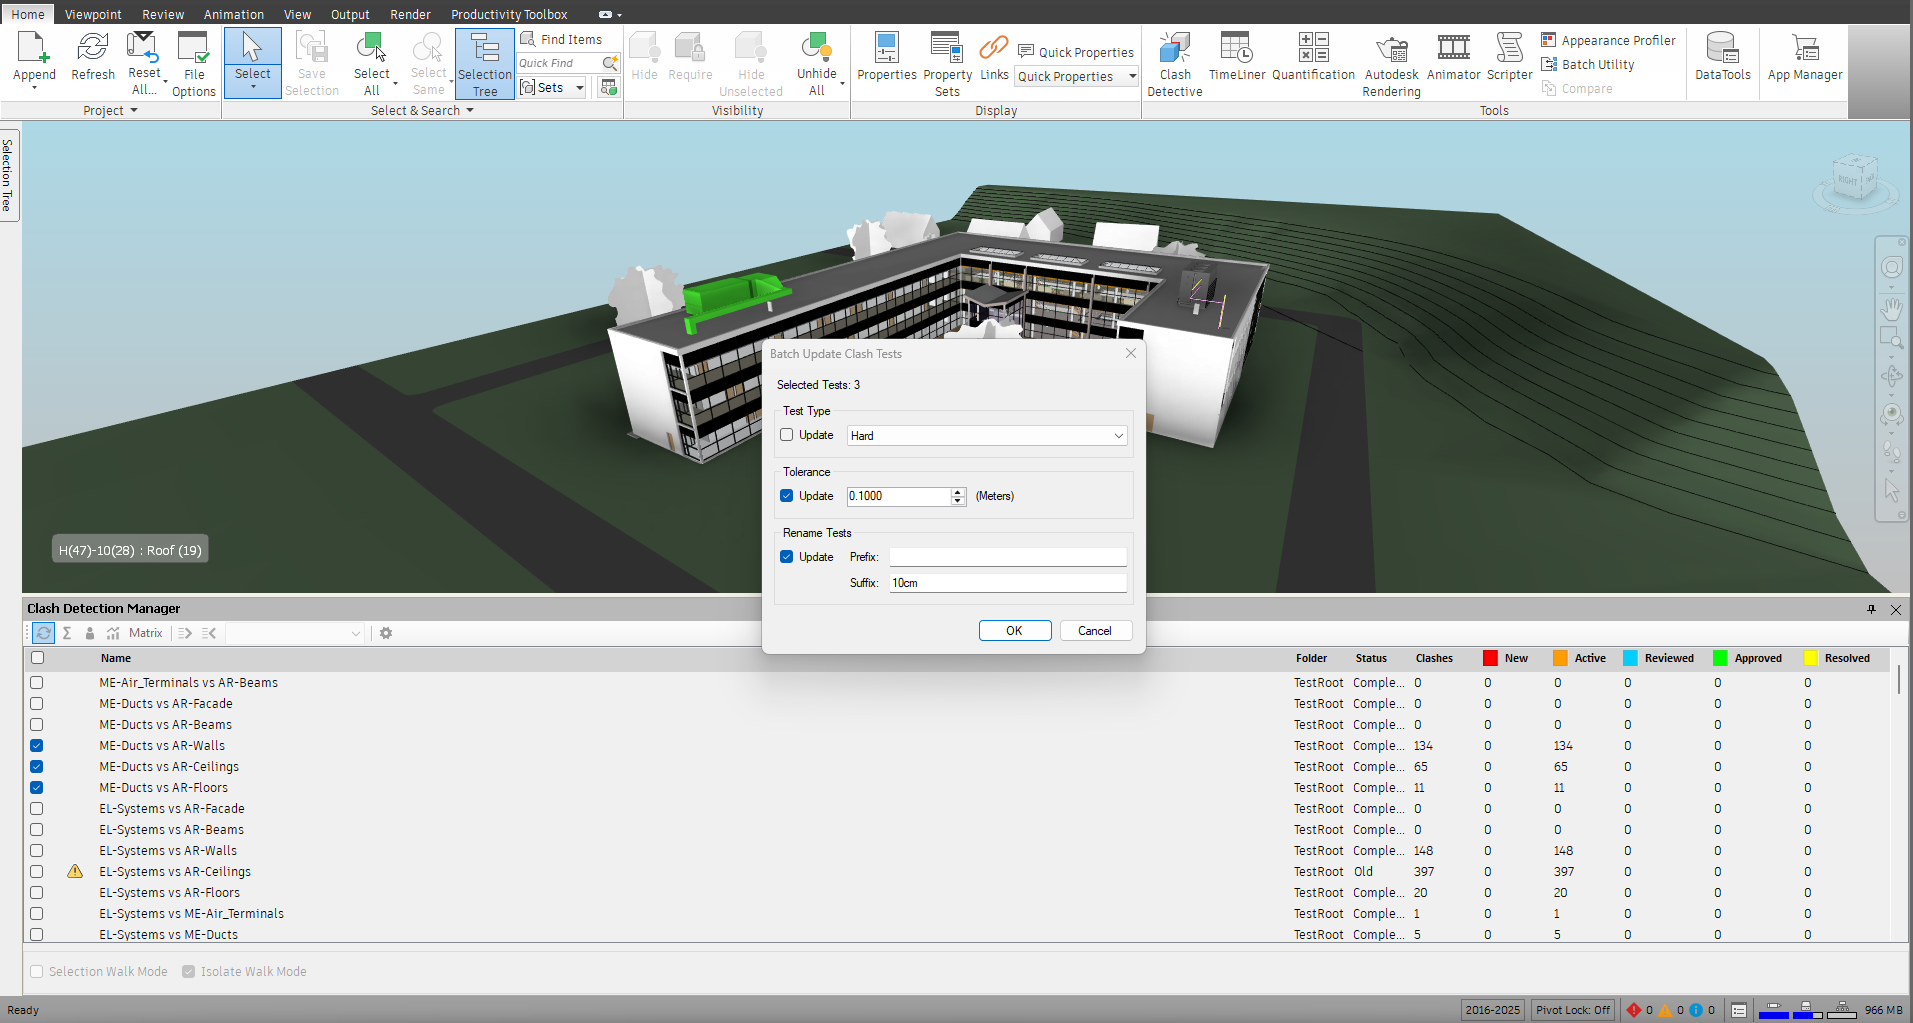
The Batch Update Clash Tests dialog edits the checked tests while keeping their results. Tick the tests first, then right-click one of them and choose Batch Update….
- Selected Tests: shows how many tests you checked.
- Test Type: tick Update and choose Hard, HardConservative, Clearance or Duplicate. The box is pre-filled when all checked tests already share one type.
- Tolerance: tick Update and type the value (up to four decimals) in the unit shown next to the box, which is your current display unit. The box is pre-filled when all checked tests share the same tolerance.
- Rename Tests: tick Update and type a Prefix: and/or a Suffix:; both are added around the existing name exactly as typed, so include a space or separator yourself (” 10cm” turns “ME-Ducts vs AR-Walls” into “ME-Ducts vs AR-Walls 10cm”).
- OK asks you to confirm (“This will update N clash test(s)…”), then updates the tests behind a cancellable progress bar and shows how many were updated and which failed. Cancel closes without changes.
At least one Update box must be ticked, and a rename needs a prefix or a suffix.
Run groups
A run group is a saved list of tests so that the same batch can be ticked again with one click, in this session or next week.
- Tick the tests that belong together (for example every test of one level).
- Click the run-group export button and save the XML file; the proposed name is “Export”, so give it a meaningful one.
- Later, click the run-group import button, pick one or more XML files, and the drop-down lists them by file name.
- Pick a group in the drop-down: its tests are ticked (tests that no longer exist in the model are skipped), and Update selected clash tests runs them.
Exporting the Excel reports
Every report works on the checked tests, asks where to save the workbook (the Desktop is proposed) and opens the file when it is written. The export shows a progress bar and can be cancelled; a cancelled export writes nothing.
Every workbook starts with a Summary sheet: the model file name, the export date, the Navisworks version, the report name, the tolerance unit and how groups were counted, followed by a table with one row per test and the New, Active, Reviewed, Approved, Resolved and Total counts, a totals row and a green-to-red colour scale. Then comes the Clash Detection sheet with the data, and for the Standard and Assigned To reports a Pivot sheet.
| Button | What the Clash Detection sheet holds |
|---|---|
| Summary clash detection report (Standard) | One row per test and status: Test Name, Test Type, Last Run Date, Tolerance (in your display unit), Clash Status, Count. The Pivot sheet crosses tests with statuses. |
| Clash detection report with regards to assignment (Assigned To) | The same counts broken down by assignee: Assigned To, Test Name, Test Type, Last Run Date, Clash Status, Count. The Pivot sheet crosses assignee and test with status. |
| Detailed clash detection report | One row per clash: Test Name, Test Type, Clash Name, Clash Status, Assigned To, Approved By, Priority, Created, Approved, Resolved, Resolved By, Age (days), Last Run Date, Distance, Clash Point X/Y/Z (all in your display unit), Nearest Level, Nearest Grid, and for both items the Name, Category, Source File and Revit Id, then Description, Last Comment and Comment Count. No pivot. |
| Matrix | Clashes per pair of selection sets, see below. |
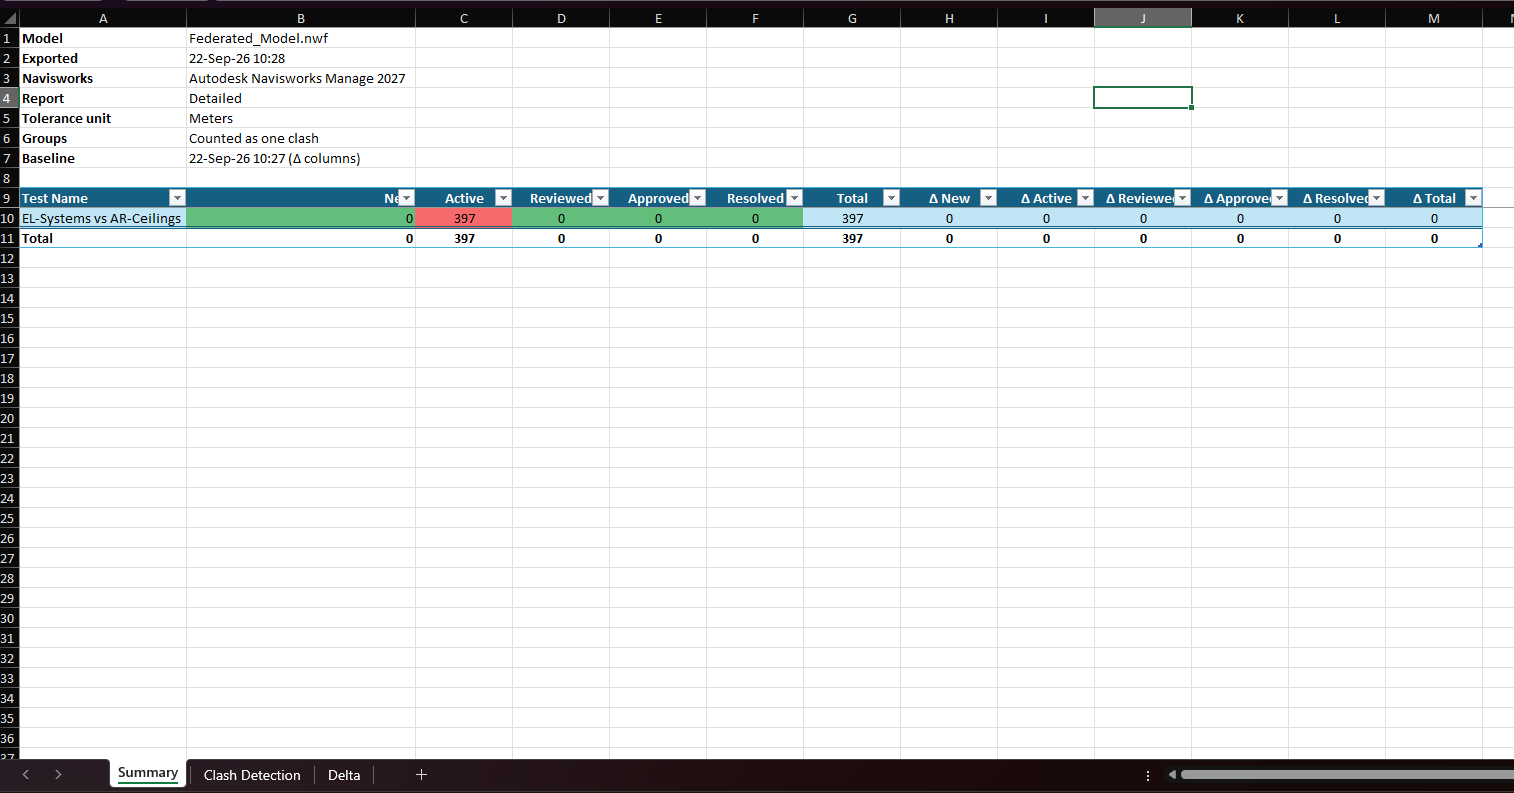
Count Groups as Single Clash (Settings) decides whether a clash group is exported as one row with the group’s status or as its member clashes.
The Matrix report
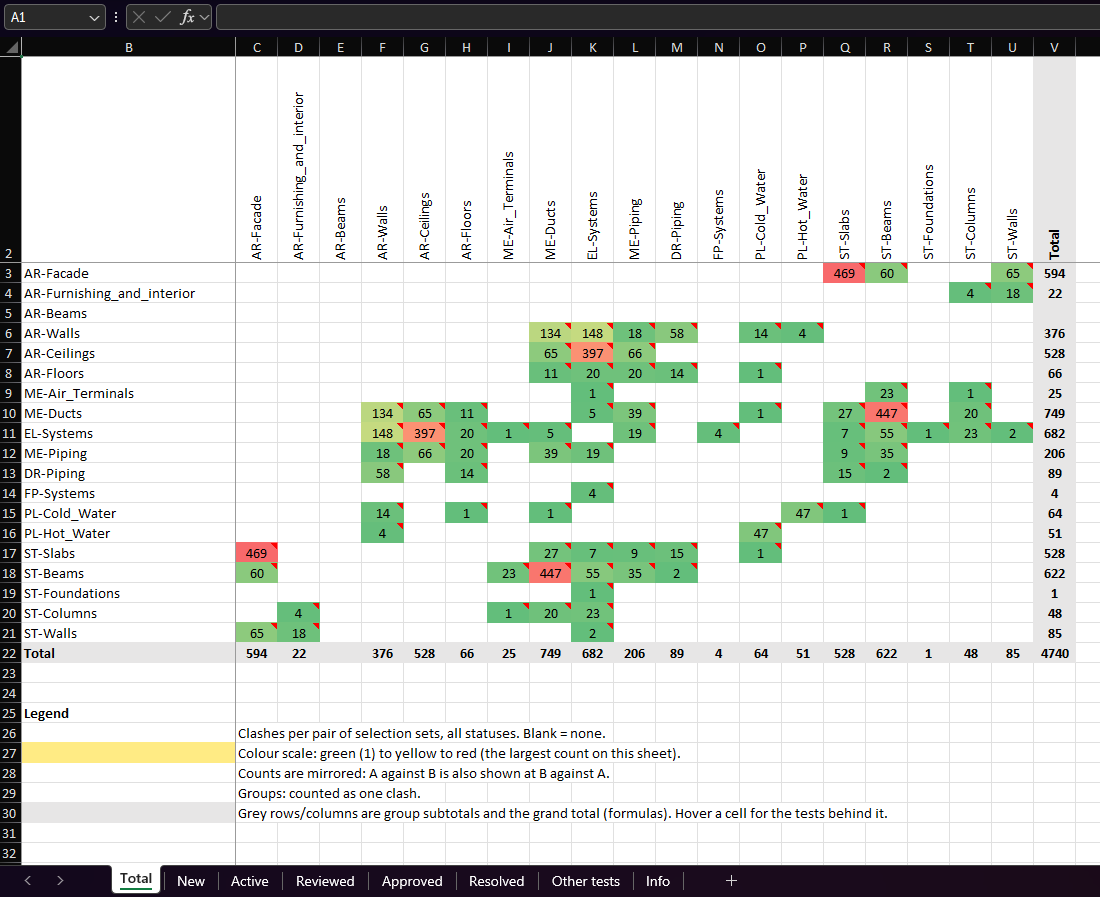
Matrix puts the checked tests on a grid with selection sets on both axes and one sheet per view: Total, then New, Active, Reviewed, Approved, Resolved, optionally one User - name sheet per assignee plus Unassigned, an Other tests sheet and an Info sheet. Each cell holds the number of clashes between the two sets, blank when there are none, with a colour scale, group subtotals and a grand total; hover a cell for the tests behind it. The dialog asks for:
- Checked tests: the count.
- Separator in test names: used only for tests whose sides are not saved selection sets, for example “Walls vs Pipes”: the name is split on the separator and both halves are matched to selection sets.
- Mirror counts (A vs B also shown at B vs A), ticked by default, so the grid reads symmetrically.
- One sheet per assignee (up to 20, plus Unassigned).
- Export asks for the file name (“Clash Matrix Report.xlsx” is proposed).
Tests that cannot be placed on the grid, because a side is not a saved set or the name does not match one, are listed on the Other tests sheet with the reason.
Keeping a history of the clashes
After the data of a Standard, Assigned To or Detailed report is read, the Append to history workbook dialog asks whether to add this export to a history workbook. The history is what turns single reports into trends: burndown, resolved per week, what changed since the last coordination meeting.
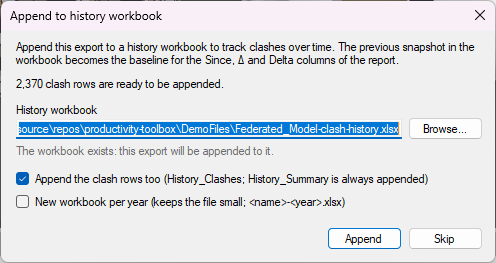
- The intro explains that the previous snapshot in the workbook becomes the baseline for the Since, Δ and Delta columns of the report.
- A line says how many clash rows are ready to be appended (a Standard or Assigned To report has no clash rows and appends the per-test summary only).
- History workbook shows the path:
<model name>-clash-history.xlsxnext to the model file by default (on the Desktop when the model has never been saved). Browse… picks or creates another workbook. The line below says whether the workbook exists and will be appended to, or will be created. - Append the clash rows too (History_Clashes; History_Summary is always appended): keep it ticked for the Detailed report to store one row per clash; the per-test counts go into History_Summary either way.
- New workbook per year (keeps the file small; <name>-<year>.xlsx) writes a yearly file; the exports of a new year take last year’s workbook as their baseline until this year’s workbook holds a snapshot of its own (a clash table for a Detailed export). If last year’s workbook was made with a different model, unit or groups setting, a warning asks whether to compare with it anyway; No starts this year’s history without it.
- Append adds the snapshot, Skip writes the report without touching any history.
When the chosen workbook already holds an earlier snapshot, the report itself gains:
- a Since <date> column right after Clash Status on the Detailed sheet, with New, Persisting, Persisting (moved), Reappeared or Resolved per clash, and a Status Change such as “Active → Approved”;
- Δ New, Δ Active, … and Δ Total columns and a Baseline line on the Summary sheet;
- a Delta sheet with counts by test, nearest level and assignee, and a list of the clashes resolved since the baseline (they are no longer in the current rows, so this is the only place they appear).
Clashes are recognised again after a test is compacted, re-run or renamed, and across files. The workbook records the model, the display unit and the groups setting it was made with; if the next export differs, a warning lists the differences and asks whether to append anyway.
Tracking progress week to week
- Open the model and run the tests you report on (tick them, Update selected clash tests).
- Tick the same tests and click Detailed clash detection report.
- Save the report under a dated name.
- In Append to history workbook, keep the default workbook next to the model, leave Append the clash rows too ticked and click Append. The first week the status line says the workbook will be created, and the report has no Baseline line and no delta columns yet.
- Next week, repeat steps 1 to 4 with the same tests and the same settings. The dialog now says the workbook exists and will be appended to.
- Open the report: read the Since <date> column to see which clashes are new, which persist and which moved, the Δ columns on the Summary sheet for the change per test, and the Delta sheet for what was resolved and by whom.
- For charts over more than two weeks, open the history workbook and build a pivot or a Power BI report on the History_Summary table (SnapshotDate, Test Name, Status, Count).
Tips
- Keep the same tests ticked from week to week. A test left out of an export is not compared and its clashes are not marked resolved: its rows and counts from the previous snapshot are copied into the new one unchanged (in History_Clashes with an empty Delta), so the next export that includes the test again compares it with the last time it was exported. This applies only to a test that is still in the model: when you delete a test, its open clashes are marked resolved at the next export and it drops out of the history summary.
- The counts of a group depend on Count Groups as Single Clash; change it in Settings before exporting, not between two snapshots of the same history, or the delta will compare different things (the workbook warns you).
- Set Status For All Results and Batch Update can be undone with Navisworks Undo; a cancelled batch keeps what was done before the cancel.
- The tolerance in Batch Update and in the Standard report is in your current display unit (Options > Interface > Display Units), not in the document’s unit.
- If the history workbook is open in Excel, the export asks you to close it and press Retry; Cancel skips the history for this export and the report is still written.
Clash Results
Clash Results toggles the Clash Results dock pane (its title bar reads “Clash Results Navigator”). Where the Clash Manager works per test, this pane works per result: it lists the clashes and groups of one test, isolates them in the model as you step through the list, filters them by status, finds the clashes that touch an element you click in the model, and lets you rename, group, auto-group and set the status of many results at once.
The Clash Results pane at a glance
![The Clash Results Navigator pane showing ME-Ducts vs AR-Walls [134: 134 New] after an auto-group by Nearest grid intersection, then Nearest level, with the first two groups expanded and the colours drop-down on Red / Green.](/guide/images/210-results-pane-populated.png)
- Toolbar:
- The test drop-down lists every clash test with its result counts in brackets, “ME-Ducts vs AR-Walls [134: 134 New]” or, once some are dealt with, “[134: 130 Active, 4 Resolved]” (statuses with no results are left out); a test inside a folder is shown as “Folder/Test”. Choosing a test fills the list and isolates the test’s elements in the model, the two sides of each clash red and green.
- The filter button (funnel icon) opens the Filter clash results dialog.
- The refresh button re-reads the test and isolates it again.
- Auto-group… groups every clash of the selected test by a rule (enabled while a test is selected).
- The colours drop-down recolours the isolated test on the fly: Red / Green (the default every time the pane opens) colours the two sides of each clash, By status gives every clash one colour per status (New red, Active orange, Reviewed light blue, Approved green, Resolved yellow). The Set Colors to Status setting only affects the Clash Manager.
- Highlight intersected appears only while Show intersecting clashes is ticked; it selects in the model both items of every checked row.
- Result list: one row per top-level clash or group, groups expandable to their member clashes, with the columns Clash Result (the name), Status, Assigned To and Date Reported. Column widths are kept when you switch tests, and the expanded groups, the check marks and the scroll position are kept when the list is rebuilt.
- Check boxes: the checked rows are what the right-click menu acts on. Checking a group checks its clashes; checking a clash inside a group checks the whole group. The right-click menu is only available while at least one row is checked.
- Focus on list item selection: clicking a row zooms the view to the clashing items.
- Isolate clash result: clicking a row hides everything but the clashing items.
- Show intersecting clashes: selecting elements in the model filters the list to the clashes those elements take part in and checks them. While this is on, the two walk options above are switched off and disabled.
- Focus on model selection: available only with Show intersecting clashes; zooms to the intersecting clashes found.
Filtering the list
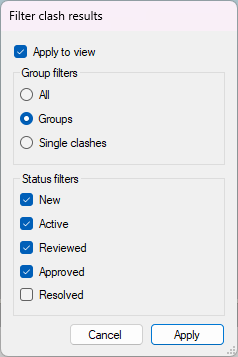
The Filter clash results dialog has, top to bottom:
- Apply to view: ticked by default; on Apply the model is isolated to the elements of the filtered results, and zoomed to them when Focus on list item selection is ticked.
- Group filters: All, Groups (only group rows) or Single clashes (only ungrouped clashes).
- Status filters: tick New, Active, Reviewed, Approved, Resolved to keep those statuses in the list. A group is filtered by its own (aggregate) status.
- Cancel and Apply.
The filter stays in force while the pane is open and applies to every test you switch to.
Walking through the clashes
- Pick the test in the drop-down; the model is isolated to its clashes.
- Tick Isolate clash result and Focus on list item selection.
- Click a row: the view isolates and zooms to the two items of that clash (or of every clash of a group). Use the arrow keys and click again, or click the next row.
- To see everything again, untick both boxes and use Navisworks’ Unhide All.
Finding the clashes behind an element
- Tick Show intersecting clashes.
- Select an element in the model, or several. The list shrinks to the clashes of the selected test that involve the selected elements (a whole layer or parent selection works too), and those rows are checked.
- Tick Focus on model selection to zoom to them, or click Highlight intersected to select both items of every checked clash in the model.
- With the rows checked, right-click to rename them, add them to a group or set their status.
- Untick Show intersecting clashes to get the full list back; the model selection is cleared.
The right-click menu
- Rename opens the Rename ClashResults dialog for the checked rows.
- Add To Group offers New Group… (asks for a Group name: in a small New Group dialog, pre-filled with “Group - ” and a short id) followed by every existing group of the test except the checked ones. The checked clashes are moved into that group, also when they already sit inside another group. You can also drag rows onto a group row; dragging a checked row moves every checked clash.
- Auto-group test… does the same as the toolbar button.
- Set Status > New, Active, Reviewed, Approved, Resolved sets the status of every checked clash (a checked group means all its clashes). The change is one undo step and shows a cancellable progress bar; the assignee is kept.
The pane shows the assignee but does not change it; assign clashes in Clash Detective, or filter and select by assignee from the Clash Manager pane.
Renaming results
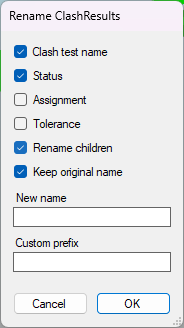
The Rename ClashResults dialog builds a new name from parts joined with ” - ”, in this order: Custom prefix, New name, the original name (when Keep original name is ticked), then Clash test name, Status, Assignment and Tolerance (the test tolerance in your display unit) for each ticked box. When Keep original name is unticked, a unique eight-character id is added at the end (an id already present in the old name is kept, so renaming twice is stable); Navisworks’ own clash numbers are not reused because Navisworks can reassign them.
- The rename applies to every checked group and every checked ungrouped clash. Tick Rename children to also rename the clashes inside the checked groups.
- The dialog refuses to close when the resulting name would be empty.
- The options are remembered while the pane is open.
Auto-grouping a test
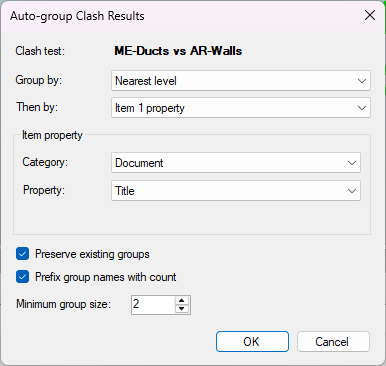
Auto-group… groups the whole selected test, not only the checked rows:
- Clash test: the test being grouped.
- Group by: the rule: Nearest level, Nearest grid intersection, Assigned to, Status, Item 1 property, Item 2 property, Item 1 source file or Item 2 source file.
- Then by: None or a second rule; its value is appended to the first with ” | ”.
- Item property (shown only for a property rule): Category: and Property: pickers. They are filled from the property cache, so run Cache Properties on the ribbon first; the dialog says so when the cache is empty, and OK stays disabled until a property is picked.
- Preserve existing groups (ticked): leave the groups that already exist alone. Unticked, their clashes are pulled out and regrouped, and groups that end up empty are removed.
- Prefix group names with count names a group “(12) Level 1” instead of “Level 1”.
- Minimum group size (2 by default): smaller buckets stay ungrouped.
Clashes without a value (no level nearby, no assignee, property missing) go into a group named “Undefined”. New groups are inserted at the top of the test in name order, with numbers in their natural order (“Level 2” before “Level 10”), and a summary states how many groups were created, how many results were moved and how many were left ungrouped. The whole run is one undo step. The run can be cancelled at any time, also in the middle of a large group: the groups already created are kept, the last one may hold only part of its clashes (the summary says so, and with Prefix group names with count its count shows what it really holds), and existing groups that were emptied are still removed.
Reviewing a test and recording the outcome
- In the Clash Manager pane, tick the test (ME-Ducts vs AR-Walls in the demo model) and click Update selected clash tests. If the test already carries old statuses, right-click it and choose Set Status For All Results > New so every result starts from the same state.
- Open the Clash Results pane and pick the test in the drop-down. Click Auto-group…, set Group by: to Nearest level, leave Then by: on None and press OK; the clashes are now bundled per level.
- Open the filter, keep only New ticked and press Apply.
- Tick Isolate clash result and Focus on list item selection and click through the groups.
- Tick the groups that are false positives, right-click and choose Set Status > Approved; tick the ones that need a modeller and set them to Active.
- Tick the Active groups, right-click, choose Rename, tick Clash test name and Status, and press OK so the names carry the context when they are exported or shared.
- Back in the Clash Manager pane, tick the test and export the Detailed clash detection report for the modelling team; the Assigned To column comes from Clash Detective if you assigned the clashes there.
Tips
- A re-run test replaces its results, so the list is rebuilt and the model is isolated again; anything you had checked is cleared.
- Switching tests never changes the filter; if a test looks empty, check the filter first.
- Grouping, auto-grouping, renaming and status changes are each one undo step in Navisworks. Creating a new group and moving the clashes into it is a single step too.
- A group cannot be dropped into itself and a drop is only accepted on a group row.
- Because a group is one row with the aggregate status, filtering by Single clashes is the quickest way to find the clashes nobody has grouped yet.
Save Matrix
Save Matrix writes an Excel workbook with the selection sets of one folder on both axes so that you can mark, cell by cell, which pairs to clash and with what tolerance and type. The button is enabled only when the model has an eligible folder: a top-level selection-set folder that holds at least two selection or search sets, directly or in up to two levels of sub-folders, and nothing else. Fill the workbook in and hand it to Load Matrix.
The Save Clash Matrix dialog at a glance
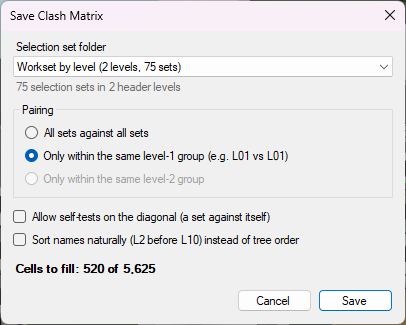
- Selection set folder: the eligible folders, listed as “Name (2 levels, 75 sets)”. The line under it says how many sets it holds and over how many header levels.
- Pairing:
- All sets against all sets.
- Only within the same level-1 group (e.g. L01 vs L01): only sets that share the first sub-folder can be paired; the default for a folder with sub-folders.
- Only within the same level-2 group: available for three-level folders, greyed out otherwise.
- Allow self-tests on the diagonal (a set against itself) unlocks the diagonal cells.
- Sort names naturally (L2 before L10) instead of tree order.
- Cells to fill: the number of editable cells for the current options, out of the total.
- Save proposes “Clash Matrix - <folder>.xlsx” and writes the workbook; Cancel closes.
Above 250 sets the dialog warns that writing and opening will take a while; above 1 000 sets the all-vs-all pairing is refused and you are asked to pair within a level or split the folder.
What the workbook looks like
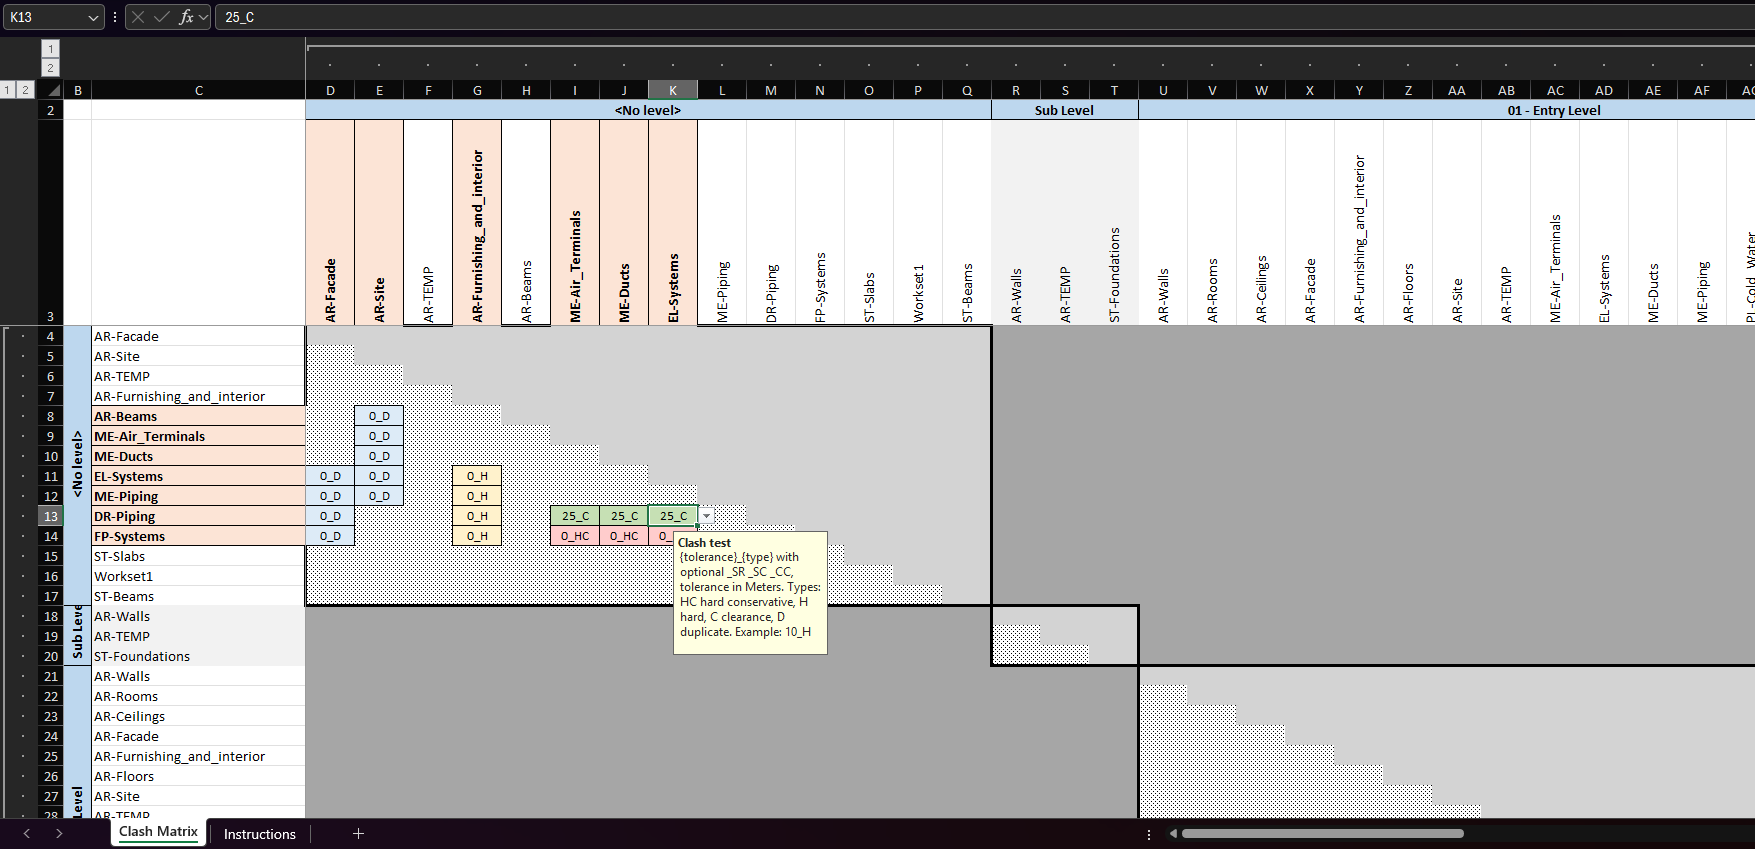
The Clash Matrix sheet has the sets along the top and down the side, with one merged header row and column per folder level. Inside each pairing block the cells below the diagonal are white and hatched: those are the ones to fill. Light grey cells above the diagonal are locked (a pair is loaded once), dark grey cells are outside the chosen pairing and ignored, and the diagonal is locked unless self-tests were allowed. A drop-down offers the common values (0_HC, 0_H, 10_H, 25_C, 0_D), the cells are coloured by clash type as you type, the set headers turn peach as soon as a set takes part in a filled cell, and a Legend below the grid and an Instructions sheet repeat the format. A hidden first row and column and a hidden PTB_Matrix sheet hold the identity of each set; do not edit, clear or reorder them.
Filling in a cell
Each cell holds {tolerance}_{type} with optional flags, for example 10_H or 50_C_SR:
| Part | Meaning |
|---|---|
| tolerance | A number in the display unit you had when the matrix was saved (the Instructions sheet names it). Both 0.5 and 0,5 are accepted. |
HC | Hard Conservative |
H | Hard |
C | Clearance (the tolerance is the minimum distance) |
D | Duplicate |
_SR | Self-intersect the row set (selection A) |
_SC | Self-intersect the column set (selection B) |
_CC | Merge composite objects before testing |
Leave a cell empty where no test is wanted.
Tips
- Put the sets you want to clash against each other in one top-level folder before saving; the Selection Set Manager under Other Tools helps to check what each set contains.
- A folder that contains anything other than folders and sets, or sets deeper than two sub-folder levels, is not offered.
- The workbook cannot be written while a file of the same name is open in Excel; close it and save again.
Load Matrix
Load Matrix reads a filled-in matrix workbook and creates one clash test per filled cell, or updates the test that already exists for the same pair of sets. Nothing is changed before you have seen the plan and pressed Load.
The Load Clash Matrix dialog at a glance
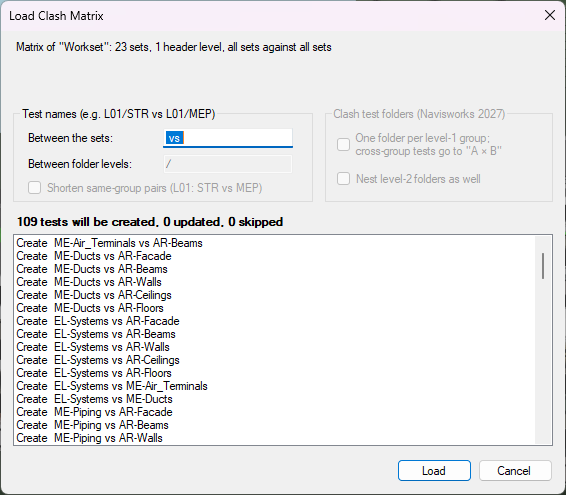
- The first line describes the workbook: “Matrix of “Workset”: 23 sets, 1 header level, all sets against all sets”. A note appears when the workbook was saved with a different display unit: tolerances are read in the unit it was saved in. A note also appears when the model already holds two tests for the same pair of sets, or two tests with the same name, and one of them is about to be updated: only that one changes, and a Warning line at the top of the preview names the duplicate that is left as it is.
- Test names (e.g. L01/STR vs L01/MEP):
- Between the sets: the text between the two set paths, ” vs ” by default.
- Between folder levels: the text between folder and set names, ”/” by default; greyed out for a one-level matrix.
- Shorten same-group pairs (L01: STR vs MEP) names a pair from the same folder with the folder once, in front; greyed out for a one-level matrix.
- Clash test folders (Navisworks 2027), greyed out for a one-level matrix:
- One folder per level-1 group; cross-group tests go to “A × B” puts the created tests into clash test folders named after the level-1 folders.
- Nest level-2 folders as well for three-level matrices.
- A summary line, “42 tests will be created, 3 updated, 2 skipped”, and a preview with one line per filled cell:
- Create with the folder and the name of the new test;
- Update with the name of the existing test for that pair of sets (its name and its results are kept; tolerance, type and options are taken from the cell);
- Skip with the cell address and the reason: the cell is outside the pairing, the same pair is already in another cell, or a set was not found in the model.
- Load applies the plan behind a cancellable progress bar and shows how many tests were created and updated, how many cells were skipped and how many folders were created, plus any test Navisworks refused (with the reason) and any duplicate test left unchanged; Cancel leaves the model untouched. The whole load is one undo step, and a test that fails does not stop the others.
The naming and folder options re-plan the preview as you change them. A cell with a value that cannot be read stops the load with a message naming the cell and both sets; fix the cell and load again. Two created tests that would get the same name are told apart with ” (2)”, ” (3)” and so on.
Building clash tests from a matrix
- Organise the selection sets in one top-level folder, for example a folder per level with one set per discipline inside.
- Click Save Matrix, pick the folder, keep Only within the same level-1 group and click Save.
- Open the workbook in Excel and type the value for every pair to test in the hatched cells, using the drop-down for the common ones (10_H for hard clashes between structure and services, 50_C for clearance, 0_D for duplicates). Save and close Excel.
- Click Load Matrix and open the workbook.
- Check the summary and scroll the preview; every line reads Create the first time. Tick Shorten same-group pairs if you prefer “L01: STR vs MEP” names, and leave the folder option on to get one clash test folder per level (both are available because the folder from step 1 has sub-folders).
- Click Load and wait for the summary.
- Open the Clash Manager pane: the new tests are listed with their folder. Tick them and click Update selected clash tests to run them.
- When the tolerances need adjusting later, edit the cells and load the workbook again: the preview now shows Update for the pairs that already have a test, Create for cells you filled since, and Skip for cells that cannot be loaded. The existing tests are updated in place and keep their results and statuses.
Tips
- A set that was renamed or moved after the matrix was saved is still found through its hidden id; a set that was deleted makes its cells Skip.
- Only one cell per pair is loaded; if you fill both A×B and B×A, the one below the diagonal wins.
- Loading a matrix saved on a machine with another display unit is safe: the tolerance is converted from the unit recorded in the workbook.
- An update never renames a test: if you changed the naming options, the new names apply to created tests only.
Something unclear or out of date in this chapter? Write to [email protected].