Group Elements
Build nested groups from property rules, colour the model, save them as selection or search sets, and reuse rules on the next model.
The Group Elements panel breaks a model down into nested groups by property values: by level, by category, by system, by any property you name, by a numeric range or by a list of values. A grouping is a small rule set that you build in a dialog and run over the whole model or over the current selection. The result is a tree of groups in the Group Elements pane, optionally coloured in the model, that you can walk through, isolate, save as selection or search sets and reuse in the QTO, Image and HTML reports and in Explode Model. The panel also holds the rule import and export, the Settings dialog and the property cache that speeds up the property pickers and the grouping itself.
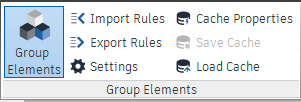
Group Elements
Group Elements shows or hides the Group Elements dock pane. The button stays pressed while the pane is open. The pane is where you create, edit, colour and save groupings; it needs a loaded model and is otherwise greyed out.
How a grouping works
A grouping is a named rule set with one rule per level:
- Rule 1 splits the elements in scope into groups, one group per distinct value of the rule’s property.
- Rule 2 splits every group of level 1 again, and so on. The tree nests as deep as you add rules, so a rule set Level then Category gives every level its own set of categories.
- Elements that do not carry the property of a rule are collected in a group called [UNDEFINED] at that level. The Level rule is the exception: a Revit file lists elements that have no level under a layer of its own, <No level>, so that name appears as a level group instead.
- Exactly one level of the rule set can be coloured. Groups on that level that share a name share a colour, so the same category on two levels is painted the same.
- The scope is either the Whole Model or the Current Selection; the selection scope includes everything below the selected items. Only real geometry elements are grouped (not files, layers or containers).
The rule types are:
| Rule | Groups by | Notes |
|---|---|---|
| Source File | The file each element was loaded from | Handy for federated models |
| Level | The element’s level (the Navisworks layer of the item) | Works for every file format that maps levels to layers |
| Category | Revit category | Revit files only |
| Family | Revit family | Revit files only |
| Type | Revit type | Revit files only |
| Workset | Revit workset | Revit files only |
| System | The System Abbreviation property of the element | MEP models |
| Material | Revit material name | Revit files only |
| Custom Text Property | Any category/property you pick, whole value or a part of it | See Group by Custom Textual Property |
| Custom Numeric Property | Any numeric property, split into ranges | See Group by Custom Numeric Property |
| Range of Values | One group per value in a list you type | See Group by List of Values |
Each of the eight predefined rules can appear once in a rule set; the three custom rules can appear as often as you need.
The Group Elements pane at a glance
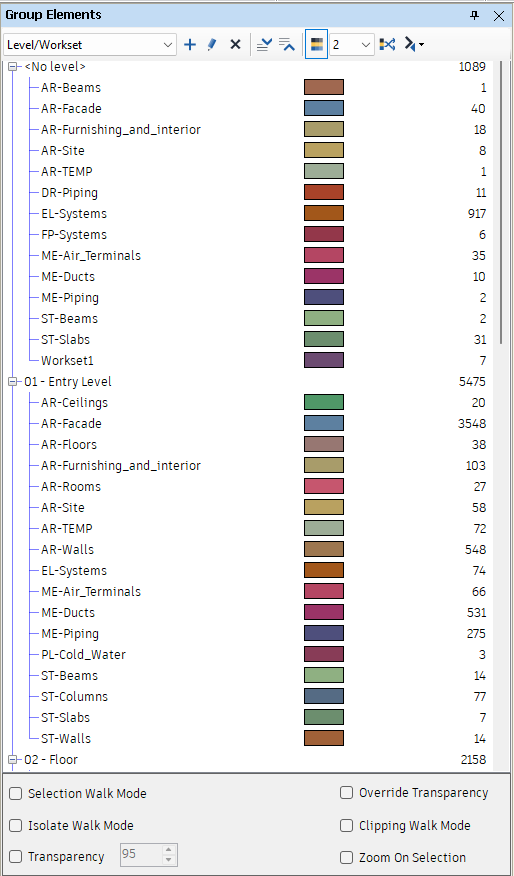
From top to bottom:
- Group combo box: every grouping made in this session. Choosing one shows its tree and repaints the model with its colours.
- New: opens the Rule Set dialog for a new grouping.
- Edit: opens the Rule Set dialog on the chosen grouping and rebuilds it when you press OK. The scope cannot be changed while editing; the rules run again over the elements the grouping already holds.
- Remove: deletes the chosen grouping from the session.
- Expand all / Collapse all: open or close every branch of the tree. The first time a grouping is shown its tree is fully expanded. After that each grouping remembers the branches you had open and its scroll position, so switching to another grouping and back, or pressing Edit, puts you where you left it. Appending or unloading a model, or opening another file, drops the groupings and what they remembered.
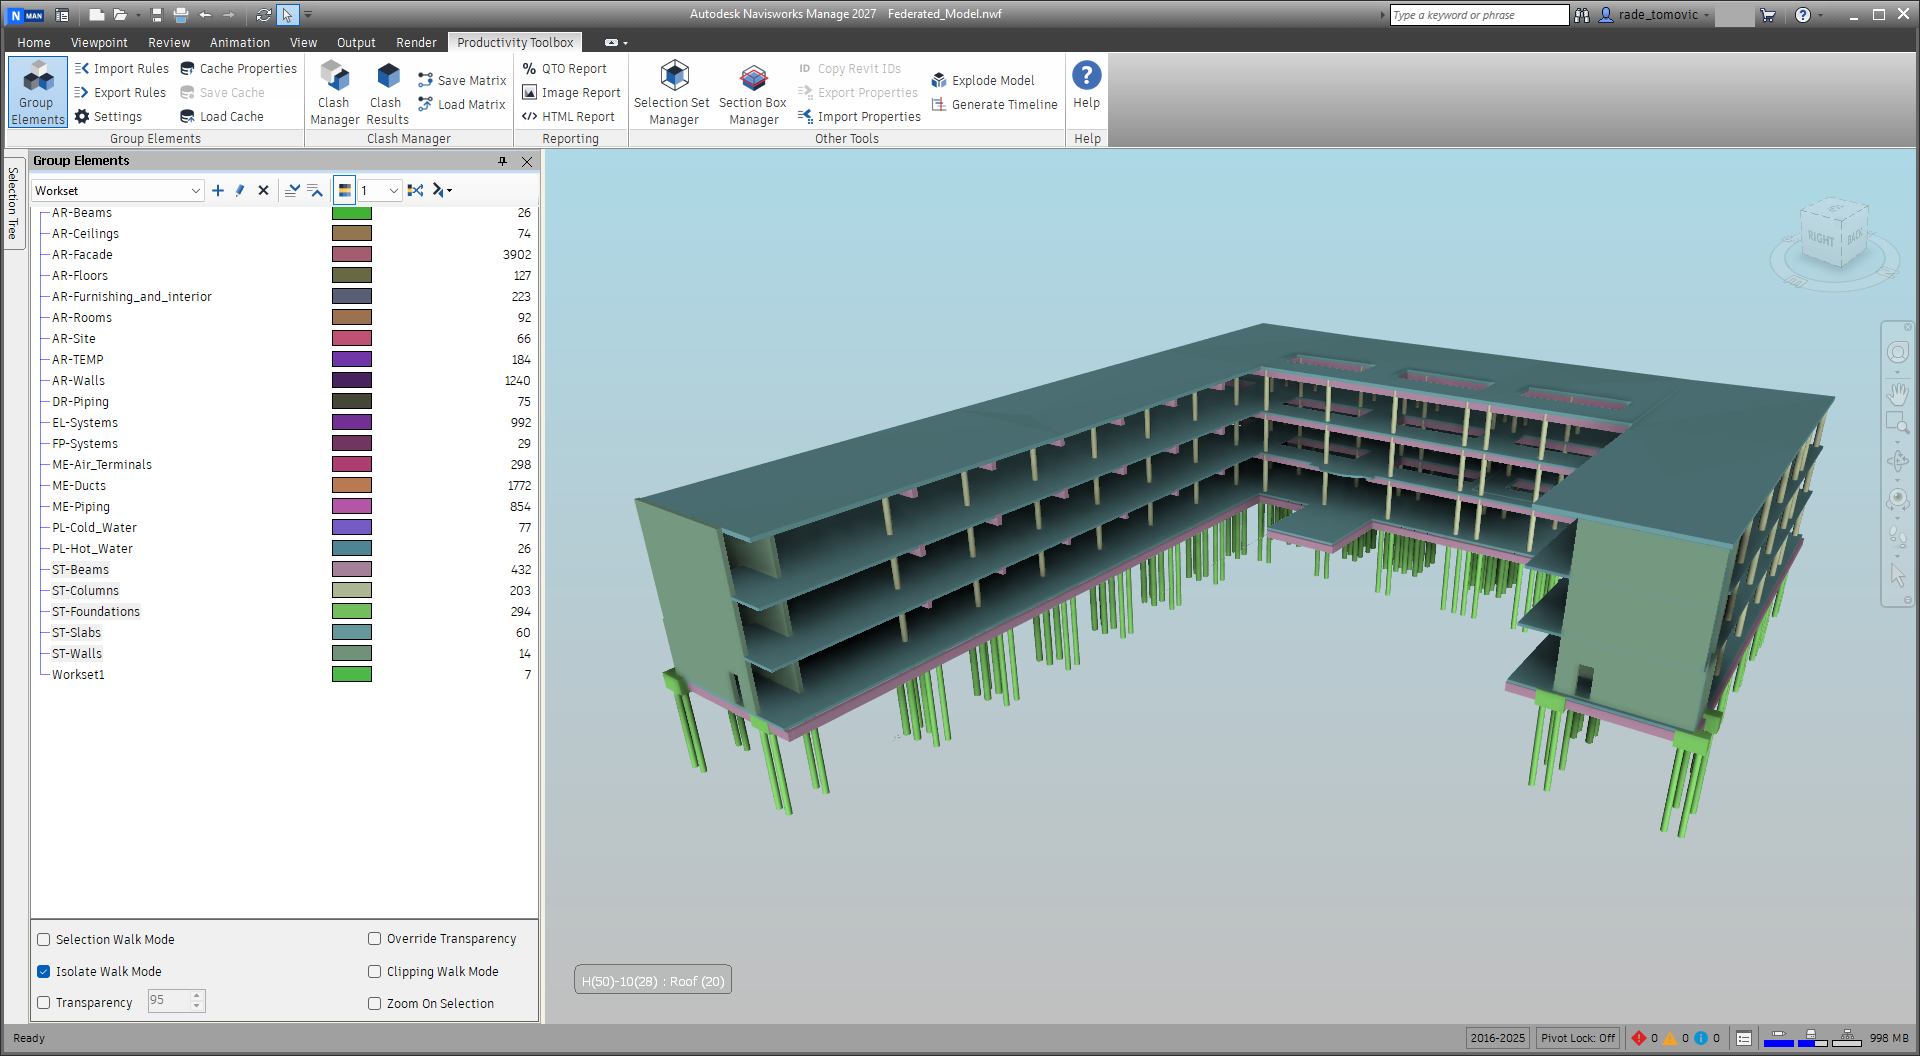
- Apply coloring: a toggle, on by default. While it is on, the level in the next box is painted in the model; switching it off greys out the colour level box and Shuffle colors.
- Colour level combo box: which level of the tree carries the colours. Changing it repaints the model at the new level, keeping colours the groups already have.
- Shuffle colors: draws a fresh set of colours for the colour level.
- Additional options (the drop-down at the end of the toolbar): Export, Import and Settings, the same commands as the ribbon buttons.
- Walk mode options: what a click on a group in the tree does to the view (see Walking through the groups).
- Isolate Walk Mode hides everything except the clicked groups.
- Transparency with a number box: with Isolate Walk Mode on, the rest of the model is greyed and made transparent instead of hidden; the number is the transparency in percent (100 is invisible). The box starts at the Default Transparency from Settings.
- Selection Walk Mode selects the elements of the clicked groups in the model. Unticking it clears the selection.
- Clipping Walk Mode sets the clipping planes to the bounding box of the clicked groups.
- Zoom On Selection frames the clicked groups in the view.
- Override Transparency makes the coloured elements fully opaque when the colours are applied, so glass, air terminals or other transparent materials show their group colour.
- Group tree with three columns: Groups (the group name), Color (a swatch for groups on the colour level) and Count (elements in the group). Clicking the swatch of a group on the colour level opens a colour picker for that group; clicking a swatch on any other level shows This level can’t change color. Please choose node at level N.
The Rule Set dialog at a glance
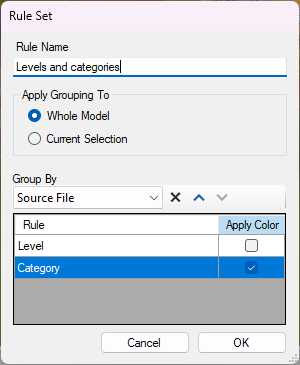
- Rule Name: the name shown in the group combo box and used for the selection set folder. Leave it empty and the rules are joined with ”/” into a name, for example Level/Category.
- Apply Grouping To: Whole Model or Current Selection. The dialog opens on Current Selection when something is selected, otherwise on Whole Model. Both are greyed out when you edit an existing grouping.
- Group By: a drop-down of rule types. Picking a predefined type adds it as a row straight away; picking Custom Text Property, Custom Numeric Property or Range of Values opens the matching dialog first and adds a row when you press OK there. A predefined type disappears from the list once used and comes back when its row is removed.
- The rule grid: column Rule shows the rule (custom rules as Category/Property, with :{start,length} for a substring, :[a,b,c] for numeric split points and a [Any Of] prefix for a list of values); column Apply Color is a tick box; ticking one row unticks the others. Leave every box unticked and the grouping is built without colours.
- Toolbar: Remove selected rules, Move selected rule up, Move selected rule down. The order of the rows is the order of the levels. Move up and down need two or more rules; Move selected rule up is also greyed out while the first row is selected and Move selected rule down while the last row is selected.
- OK builds the grouping; pressing it without a rule shows Please specify at least one grouping rule. Cancel discards the dialog.
Building the grouping shows a progress bar (Processing model breakdown) that you can cancel. A cancelled build changes nothing: a new grouping is not added and an edited grouping keeps its previous tree; a message tells you after how many rules it stopped. When the build finishes, the model is repainted with the new grouping’s colours and the grouping is selected in the pane.
Group by Custom Textual Property
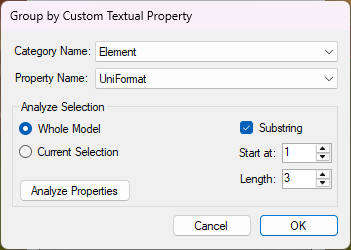
- Category Name and Property Name: the property whose value makes the groups. Both lists are empty when the dialog opens on a model without a property cache; fill them with Analyze Properties first. Pressing OK with either list empty shows Category or property name cannot be empty.
- Analyze Selection: Whole Model or Current Selection plus Analyze Properties. The scope opens on Current Selection when something is selected, otherwise on Whole Model. Pressing the button reads the categories and properties of the chosen scope and fills the two lists above. If you have run Cache Properties or Load Cache, the lists are already filled when the dialog opens and you can skip this step.
- Substring with Start at: and Length:: group by a part of the value instead of the whole value. The two boxes are greyed out until Substring is ticked. Start at counts from 1. Use it, for example, to group by the first three characters of a mark or a classification code. A value shorter than the range is grouped by the part it has, and a value that ends before Start at goes into a group with an empty name.
Group by Custom Numeric Property
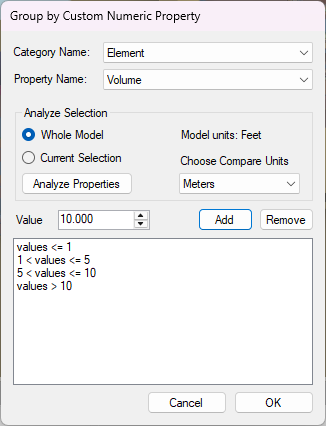
- Category Name and Property Name: the numeric property to band. Only properties that hold a number are listed; pickers filled from the property cache are filtered the same way.
- Analyze Selection works as in the text property dialog: Whole Model or Current Selection plus Analyze Properties.
- Model units: shows the units of the open model. Choose Compare Units is the unit in which you type the split points; the dialog opens on the model units and you can switch, for example, to millimetres when the model is in feet. The split points are converted to the model units before they are compared with the property values, with the dimension of the property: a length linearly, an area squared, a volume cubed, so 1 in metres becomes 35.3 cubic feet for a volume property.
- Value, Add and Remove: type a number (up to three decimals) and press Add to add a split point; the list shows the resulting bands, for instance values <= 1000, 1000 < values <= 3000 and values > 3000. Adding the same value twice shows Value is already in a list. Select a band and press Remove to drop the split point behind it.
- OK needs a category, a property and at least one split point (Numeric range cannot be empty).
The groups are named after the property and the band, for example [Element/Length] <= 1000. Bands that catch no element are not created. Elements without the property go to [UNDEFINED]. A property held as a whole number is banded like a plain number: its values are compared with the split points as typed, without unit conversion.
Group by List of Values
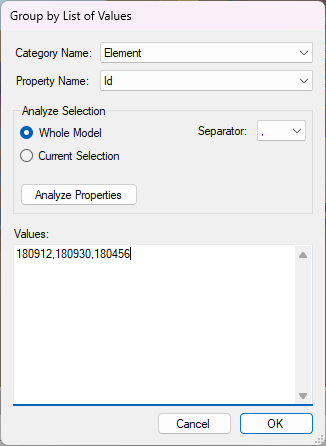
Choose Range of Values in the Group By list to open this dialog.
- Category Name, Property Name and Analyze Selection: as for the text property.
- Separator: the character that separates the values in the box below: comma, semicolon, full stop or colon.
- Values: the values you want a group for, one after the other, separated by the chosen separator. Empty entries are ignored; the list must not be empty (Values list cannot be empty).
- OK adds a rule that makes exactly one group per value you typed, in the order you typed them. A value that no element carries still gets a group, named [NOT FOUND] value, with a count of 0, so you can see at once which values did not match. Elements whose value is not in the list are left out of that level; elements without the property go to [UNDEFINED]. Numbers are matched by value, so 2.50 finds a property stored as 2.5.
Colouring
The colours come from the palettes in Settings: the 8 Colors Palette when the colour level has up to eight distinct names, the 16 Colors Palette for up to sixteen, and generated colours beyond that. If a palette has been shortened, its colours are reused in turn.
- Apply coloring on and a colour level chosen: the model is painted as soon as a grouping is built or selected.
- Shuffle colors draws new colours for the whole level. Right-click one or more groups on the colour level and choose Change colors… to give them one colour of your choice; every group with the same name takes it too.
- Colours are temporary overrides. Reset Appearances in the right-click menu clears them (the swatches in the Color column go blank until you shuffle again). Closing the pane gives the model its normal appearance back; opening it again repaints the chosen grouping.
Walking through the groups
Click a group name in the tree and the walk mode options are applied to that group (or to every highlighted group when you select several). With Isolate Walk Mode on and Transparency off, the rest of the model is hidden; with Transparency on, it is shown grey and transparent so you keep the context. Zoom On Selection frames the group and Clipping Walk Mode clips the view to it. Use Show All from the right-click menu to bring hidden elements back.
The right-click menu
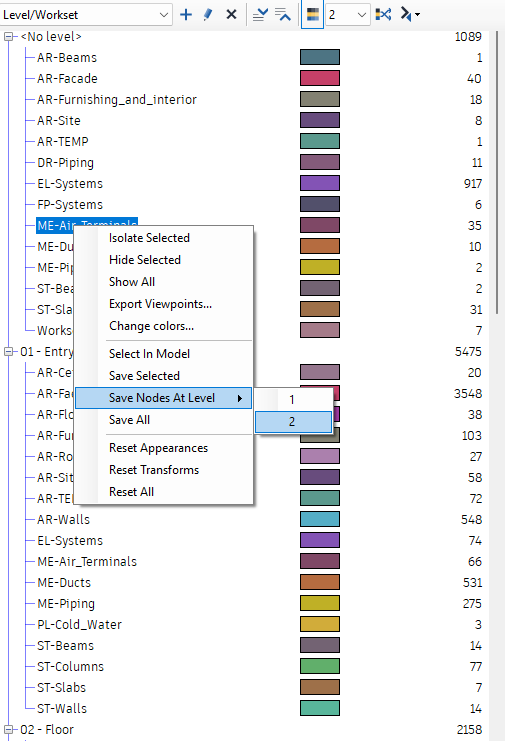
Right-click in the tree to open the menu. Most items act on the highlighted groups.
- Isolate Selected: show only the highlighted groups; everything else is hidden.
- Hide Selected: hide the highlighted groups.
- Show All: unhide everything.
- Export Viewpoints…: saves one viewpoint per lowest-level group of the current grouping into Saved Viewpoints, in folders that mirror the group tree (see Exporting viewpoints per group).
- Change colors…: pick one colour for the highlighted groups; they must all be on the colour level.
- Select In Model: add the elements of the highlighted groups to the current selection.
- Save Selected: save the elements of the highlighted groups as one selection set; the Selection set name dialog asks for the name (see Saving highlighted groups as one set).
- Save Nodes At Level > 1, 2, …: save one selection set per distinct group name on that level, all in a folder named <Grouping name> - Level N. Groups sharing a name are merged into one set, the same way they share a colour. Nothing is created when the level has no groups.
- Save All: save the whole tree as a folder of selection sets, one folder per branch and one set per leaf group. You are asked Create search-based sets (dynamic) where possible? Answer Yes for search sets that keep up with the model, No for static sets holding the current elements, or Cancel. Substring groups always become static sets. The folder is inserted at the top of the Sets window. The save shows a progress bar and can be cancelled; the sets created so far are kept and the message tells you how many.
- Reset Appearances: remove the colour and transparency overrides from the model.
- Reset Transforms: undo the element moves made by Explode Model.
- Reset All: both of the above.
Exporting viewpoints per group
Export Viewpoints… in the right-click menu turns the current grouping into a folder of saved viewpoints. It works on the grouping chosen in the group combo box, not on the highlighted rows: every lowest-level group (a group with no groups under it) gets one viewpoint, and every group above it becomes a folder, so a Level/Workset grouping gives a folder per level holding a viewpoint per category. The top folder is named after the grouping and each folder and viewpoint after its group; the folder is added at the end of the Saved Viewpoints window.
Each viewpoint is taken with the group isolated, so the hidden state and the temporary colours and transparency are saved with the viewpoint: recalling it later hides everything but the group again (with the model’s own colours, or the group’s colour if the grouping was coloured when exporting with Isolate With Transparency). When the export finishes, or when you cancel it, the model is put back the way it was: everything visible again, the isolate and dim overrides removed, the grouping’s own colours repainted and the camera returned to where it was. A cancelled export keeps the viewpoints made so far.
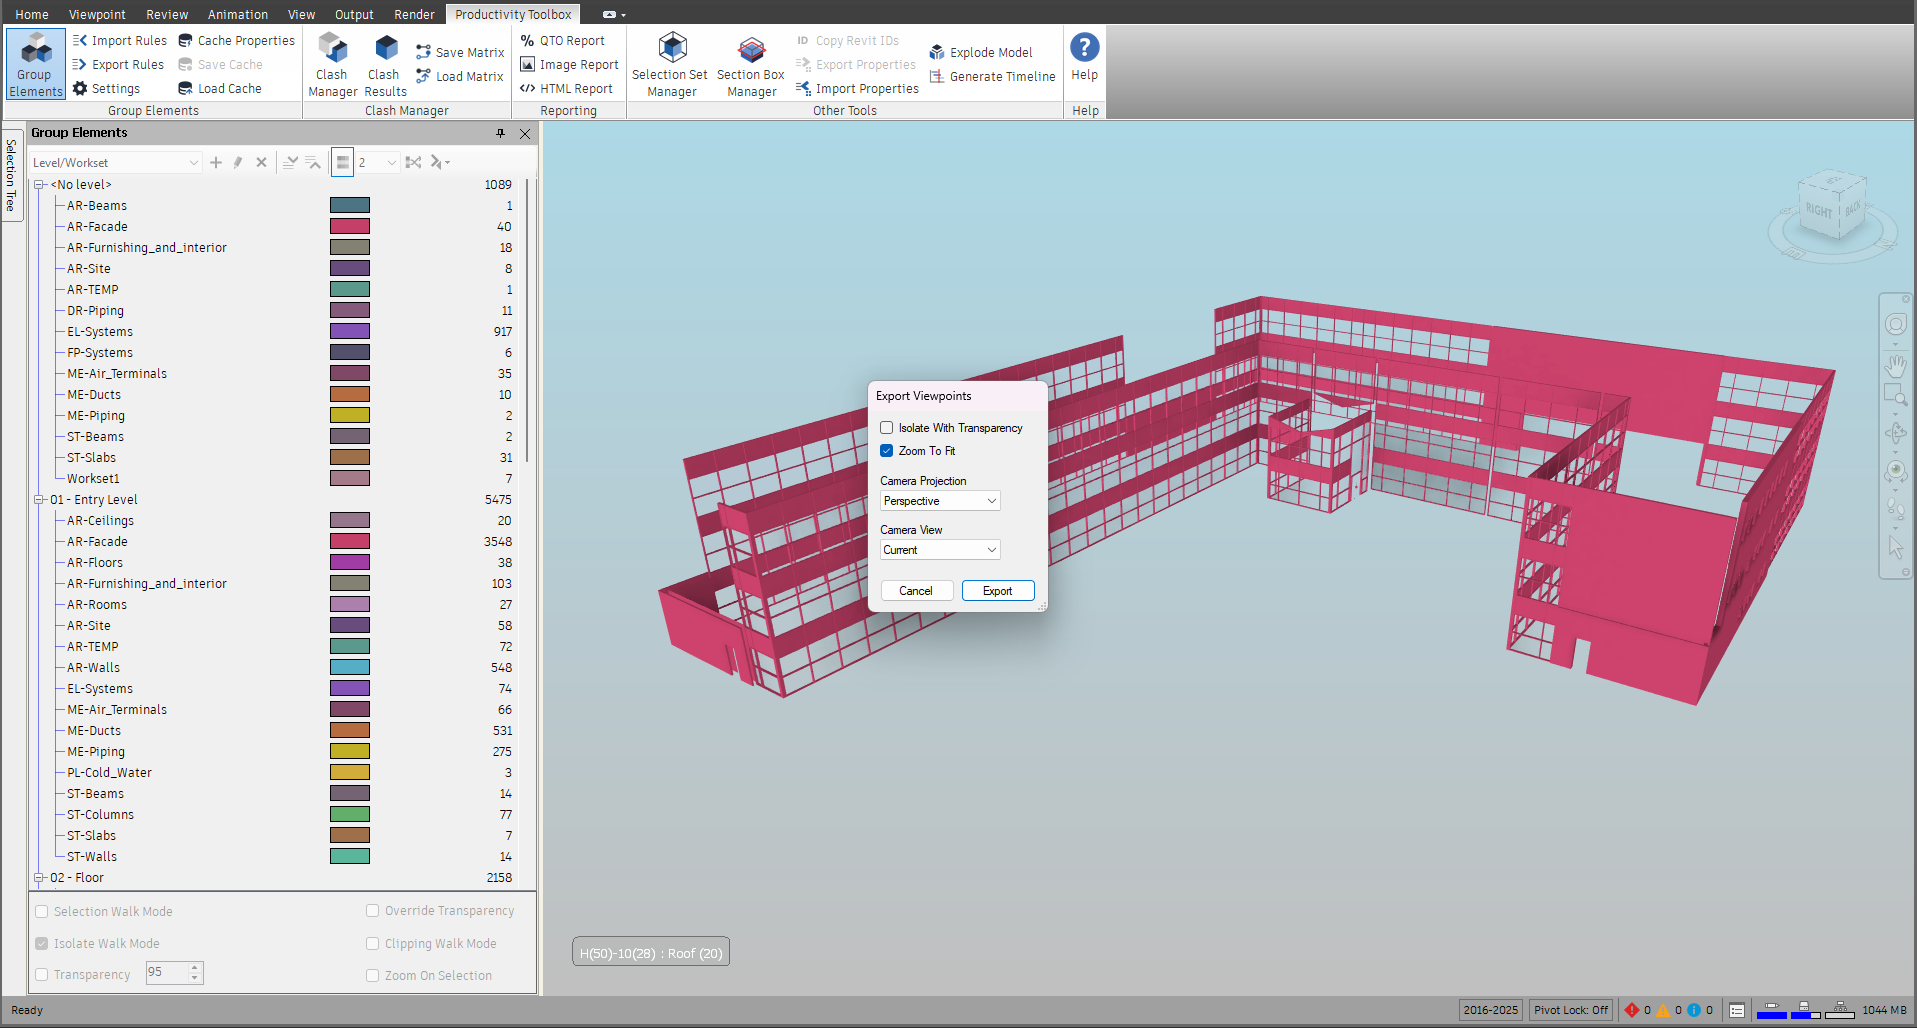
- Isolate With Transparency: off by default. Off, the rest of the model is hidden in each viewpoint; on, it stays visible in grey and almost fully transparent, so the group is seen in context, and the group is painted in its colour when it sits on the colour level.
- Zoom To Fit: on by default; every viewpoint is framed on its group from the chosen camera view. Switch it off to keep the current camera in every viewpoint and only change what is visible.
- Camera Projection: Perspective (default) or Orthographic for every viewpoint.
- Camera View: the direction the camera is aimed for each group when Zoom To Fit is on: Current (default, keeps the direction you are looking from), Top, Front, Right or Standard (an isometric-style view).
- Cancel closes the dialog without exporting. Export starts the export and shows the Exporting viewpoints… progress bar, which counts the viewpoints and can be cancelled.
Creating a viewpoint per level for a coordination meeting
- Press New in the Group Elements pane, leave Rule Name empty, choose Level in Group By, tick Apply Color on that row and press OK. The grouping is named Level and has one group per level.
- Make sure Level is the grouping shown in the group combo box, then right-click in the tree and choose Export Viewpoints….
- Leave Camera Projection on Perspective and set Camera View to Standard.
- Keep Zoom To Fit ticked and tick Isolate With Transparency so the rest of the building stays visible in grey.
- Press Export and wait for the progress bar.
- Open the Saved Viewpoints window: a folder named Level holds one viewpoint per level. Recalling a viewpoint in the meeting isolates that level again.
Saving highlighted groups as one set
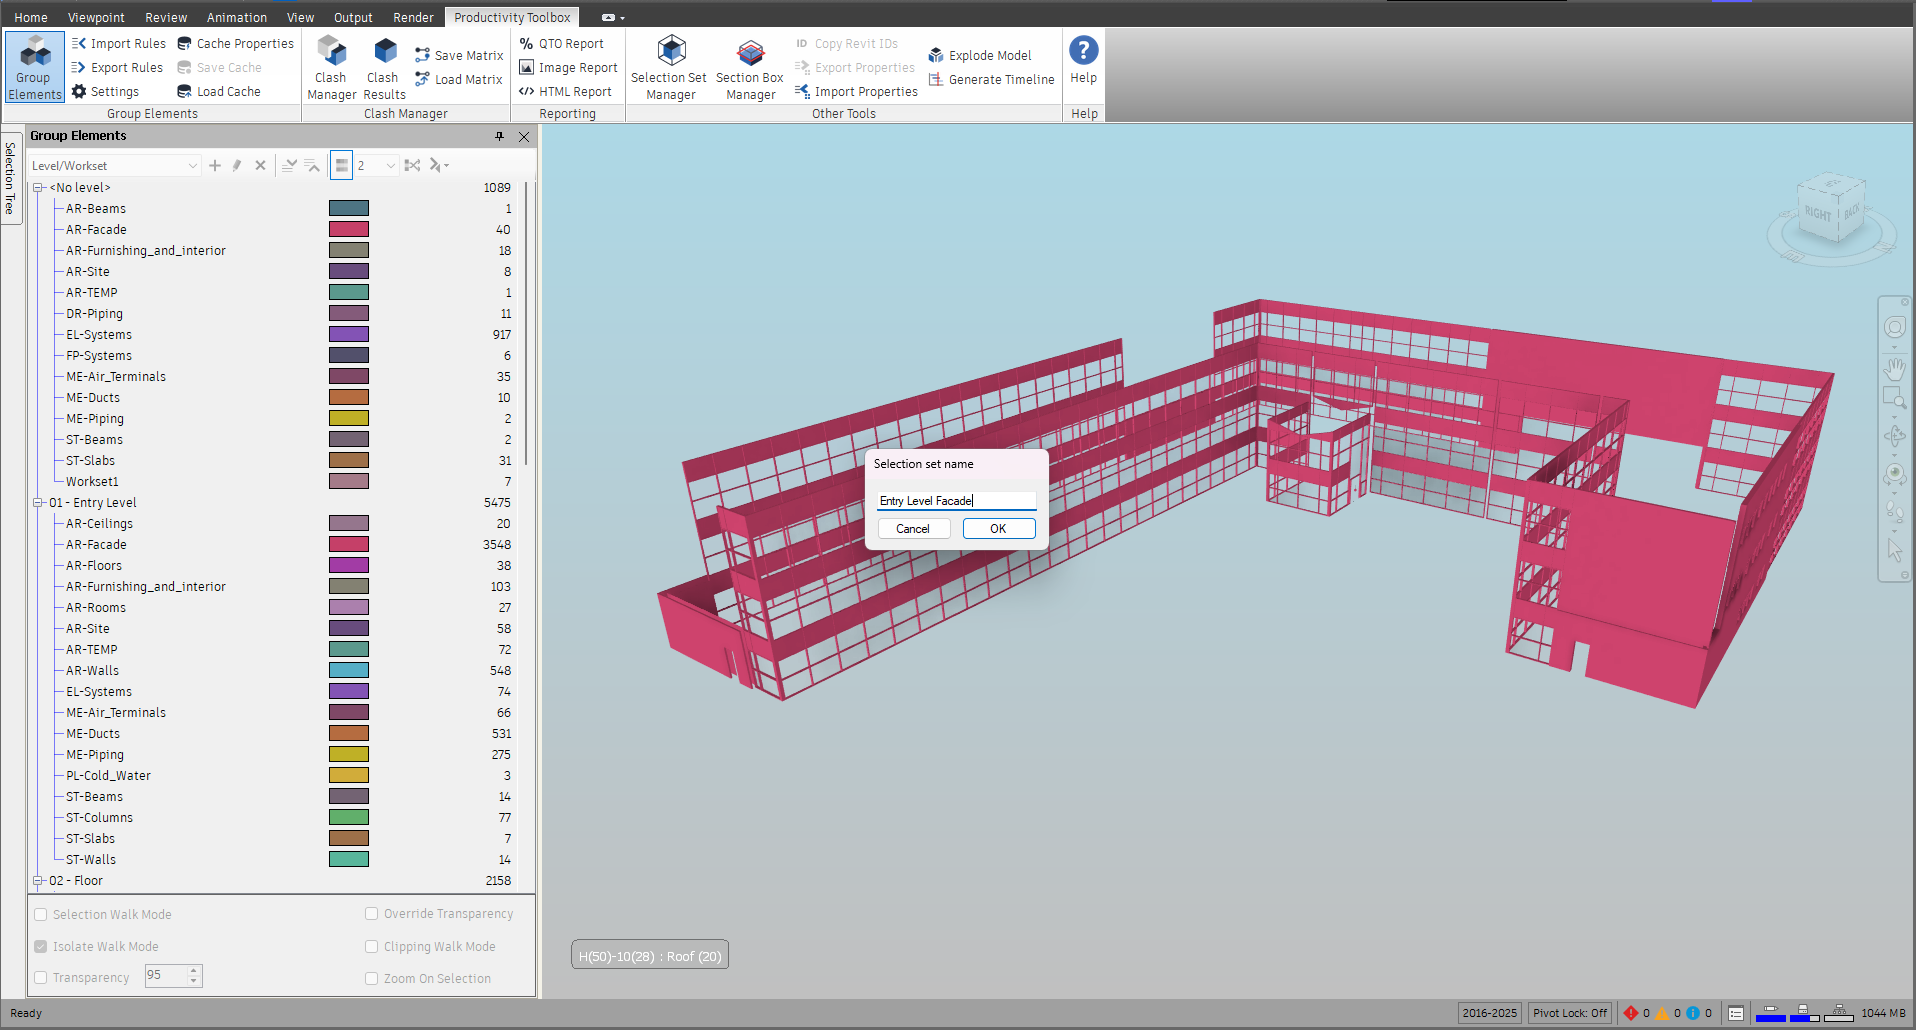
Save Selected in the right-click menu takes the elements of every highlighted group (any level, any mix of levels) and saves them as a single selection set. The Selection set name dialog has one text box and the buttons Cancel and OK; the box opens empty, there is no proposed name. Type a name and press OK: a static selection set with the current elements (not a search set) is inserted at the top of the Sets window. Pressing OK with an empty box shows Name cannot be empty and keeps the dialog open; Cancel closes it without saving. Use Save All instead when you want search-based sets.
Grouping a model by level and workset
- Open the model and press Group Elements on the ribbon.
- Press New in the pane toolbar.
- Type Level/Workset in Rule Name.
- Choose Level in the Group By list.
- Choose Workset in the Group By list.
- Tick Apply Color on the Workset row.
- Make sure Whole Model is selected under Apply Grouping To and press OK.
- Wait for the progress bar; the tree fills with one node per level (<No level> first, for the elements that have no level) and the worksets under each level, coloured per workset. The colour level box shows 2 and the Transparency box the Default Transparency from Settings, 95 unless you changed it.
- Tick Isolate Walk Mode and Zoom On Selection, then click a level in the tree to review it on its own.
- Right-click in the tree and choose Save All, then Yes, to keep the breakdown as search sets.
Grouping walls by volume
- Select the walls in the model, for example by clicking the AR-Walls group of a Workset grouping with Selection Walk Mode ticked, or by picking them in the Selection Tree.
- Press New in the Group Elements pane; Current Selection is preselected under Apply Grouping To because something is selected.
- Choose Level in Group By.
- Choose Custom Numeric Property in Group By.
- In the dialog, Current Selection is preselected under Analyze Selection as well; press Analyze Properties (skip this if the lists are already filled from the property cache), then pick Element under Category Name and Volume under Property Name.
- Model units: says Feet for the demo model. Switch Choose Compare Units to Meters so that you can type the split points in cubic metres; they are converted to cubic feet before the volumes are compared.
- Type 1 in Value and press Add; repeat for 5 and 10. The list shows the bands up to 1, 1 to 5, 5 to 10 and over 10 cubic metres.
- Press OK in the numeric dialog, tick Apply Color on the second row and press OK in the Rule Set dialog.
- Choose 2 in the colour level box if it is not selected already; each volume band now has its own colour under every level.
Tips
- Groupings live in the session. Appending or removing a model drops every grouping (and the property cache) because the groups no longer describe the document; use Export Rules to keep the rules and Save All to keep the sets before you change the model.
- Edit re-runs the rules over the elements the grouping already holds. To change the scope, make a new grouping.
- Remove clears the tree but does not reset the colours; use Reset Appearances or close the pane.
- The [UNDEFINED] group is a quick audit: an element there is missing the property of that rule.
- Search sets from Save All need a rule that Navisworks can express as a search: predefined, custom text (whole value), numeric and list-of-values rules qualify; substring rules fall back to static sets on that branch, and so does a numeric band whose elements hold the property as different kinds of number (a plain number on some, a length or a whole number on others).
- The Count column counts the geometry elements in the group; containers and layers are never counted.
Export Rules
Export Rules writes every grouping of the session (its name, its rules in order and its colour level) to an .xml rules file. The button is enabled once at least one grouping exists; otherwise No group rules available for exporting is shown. Press it, choose a file name in the save dialog (the default is Export.xml) and press Save. The file does not contain any elements or colours, only the rules, so it is small and works on any model that has the same properties.
Numeric ranges, substrings and lists of values are all kept, together with the units chosen for numeric rules.
Import Rules
Import Rules reads a rules file written by Export Rules and builds every grouping in it in the open model, so a breakdown made on one project can be applied to another. The button is enabled as soon as a model is loaded; it does not need the pane to be open, and groupings imported while the pane is closed are listed when you open it.
- Press Import Rules and pick the .xml file. A file that is not a Productivity Toolbox rules file is rejected with a message saying why; a file with one unreadable rule still imports the others and lists that rule under Failed.
- In the Rule Importer Options dialog choose Whole Model or Current Selection under Apply Rules To and press OK. The dialog opens on Current Selection when something is selected. An empty scope stops the import with a message (Select elements in the model first, or choose Whole Model).
- Before anything runs, every rule’s property is checked against the property cache when you have one, or against the first 500 elements in scope otherwise. Rules whose property was not found are listed in the Import Rules - properties not found dialog.
- Watch the Importing rules progress bar, or cancel it; the rules imported so far are kept.
- Read the summary: how many rules were imported and in what time, followed by the Imported, Failed and Skipped lists.
The properties-not-found dialog at a glance
- The first line says how many rules reference a property that was not found and where the check looked (the property cache or the first 500 elements). Every element would land in [UNDEFINED] for such a rule.
- The box lists the rules as Rule 3 ‘Name’: property ‘X’ in category ‘Y’.
- The hint below tells you how much the check proves. With a property cache the check covered every element and the rules cannot match anything; without one only a sample was checked and the property may still exist further into the model.
- Import anyway runs every rule regardless.
- Skip these leaves the listed rules out; they appear under Skipped in the summary.
- Cancel stops the import without changing anything.
The Failed list
A rule ends up under Failed in the summary when it:
- could not be read from the file (the reason names the level and the missing piece);
- threw an error while running (the message is shown);
- matched no elements, that is, no group at its first level holds anything;
- references a property which no loaded element has, so every element landed in [UNDEFINED];
- reads a property that some elements do have, but none of their values made a group: lists values of the property , but the loaded elements hold none of them for a list of values, reads the property , but the loaded elements hold no number in it for a numeric rule, and reads the property , but the loaded elements hold no value in it for any other rule.
Failed rules are not added to the pane; the rest of the file is.
Tips
- Run Cache Properties before a large import: the pre-flight check then covers the whole model, and the grouping itself runs faster.
- Only the last imported rule set that carries a colour level is painted in the model; pick any other grouping in the pane to see its colours.
- Rules files are written the same way whatever the language of Windows, so a file made on a machine with another locale imports without changes.
Settings
Settings opens the Settings dialog with two tabs. The same dialog opens from the Settings entry of the pane’s Additional options drop-down. Settings are saved per user and apply to every model.
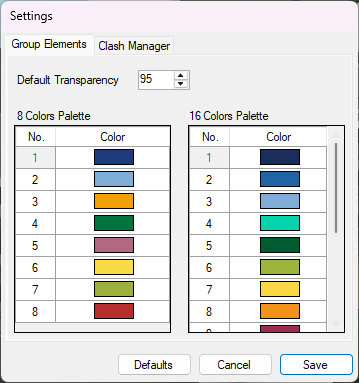
The Group Elements tab
- Default Transparency: the value the Transparency box of the Group Elements pane starts with, 0 to 100.
- 8 Colors Palette: the eight colours used when the colour level holds up to eight distinct group names. Click a cell in the Color column to pick a new colour for that row (No. is the position).
- 16 Colors Palette: the sixteen colours used when the colour level holds nine to sixteen names. Beyond sixteen the colours are generated.
The Clash Manager tab
- Set Colors to Status: when the Clash Manager colours the model, clash items take the colour of their status instead of the plain item colours.
- Count Groups as Single Clash: counts a clash group as one clash in the Clash Manager pane and in the clash reports, instead of counting every clash inside the group.
Buttons
- Defaults puts every setting back to the shipped values (the palettes included) without closing the dialog.
- Save stores the settings; Cancel discards the changes.
Cache Properties
Cache Properties scans every element of the model once and keeps the categories, properties and distinct values in memory. With a cache in place:
- the Category Name and Property Name lists of the custom text, custom numeric and list-of-values dialogs (and of the QTO Report and Import Properties dialogs) are filled as soon as the dialog opens, without pressing Analyze Properties;
- Analyze Properties for the whole model answers from the cache instead of rescanning;
- the first grouping run is faster, because the values of the predefined rules are read during the scan;
- the Import Rules pre-flight check covers every element.
Press the button and wait for the Caching properties progress bar. On a large federated model this takes a while; you can cancel it, in which case the previous cache (if any) is kept and a message says after how many elements it stopped. When the scan finishes, the cache is in place (the scan shows no summary of its own).
Tips
- The cache is dropped when a model is appended or removed. Run Cache Properties again afterwards.
- The cache holds distinct values, not which element has which value; it fills lists and checks names, it does not replace the grouping run.
Save Cache
Save Cache writes the current property cache to a .json file (default name Properties Cache.json) so that it can be reloaded later, or on another machine, without rescanning. The button is enabled once a cache has been built or loaded. A confirmation Properties cache successfully saved follows the save. The file is written the same way on every machine whatever the Windows language.
Load Cache
Load Cache installs a cache saved earlier from a .json file and confirms with Properties cache successfully loaded. From then on the pickers are filled and the Import Rules pre-flight uses it, exactly as after Cache Properties. A file that is not a cache written by Save Cache, or a damaged one, is rejected with a message saying so, and the cache you had stays in place. Load a cache that was saved from the same model, or from a model with the same properties: a cache from a different project offers categories and properties the open model may not have.
Keeping a shared cache for a large federated model
- Open the federated model and press Cache Properties; let the scan finish.
- Press Save Cache and store the file next to the model.
- On the next day, or on a colleague’s machine, open the model and press Load Cache to pick that file.
- Press New in the Group Elements pane and choose Custom Text Property: the category and property lists are already filled.
Something unclear or out of date in this chapter? Write to [email protected].