Classifications
Sort the whole model into named buckets by saved rules, see what no rule caught, total quantities per bucket, export a take-off and run the same rules on the next model.
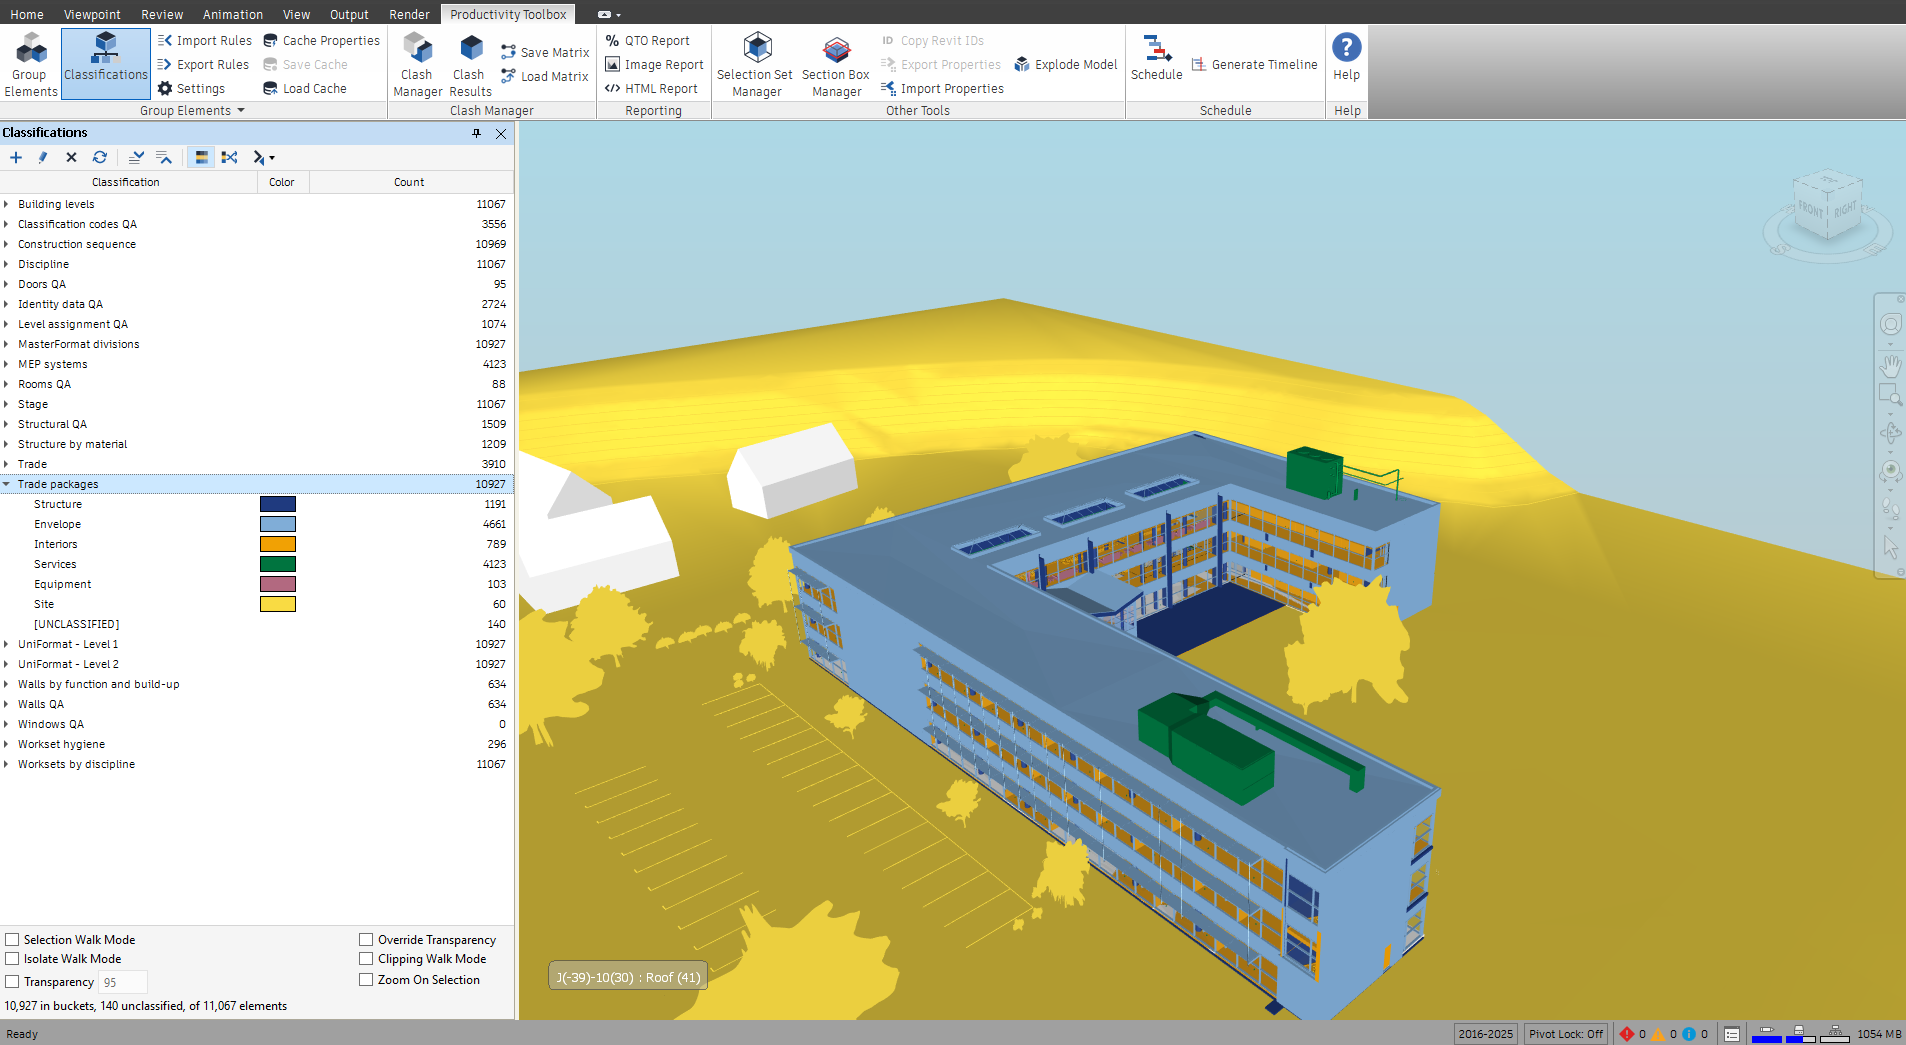
Classifications shows or hides the Classifications dock pane, the second button of the Group Elements panel. The button stays pressed while the pane is open, and the pane needs a loaded model.
A grouping builds groups from the values of a property. A classification does something different: it sorts every element of the model into named buckets by rules you write, in priority order, and it keeps those rules so you can use them again. Use a classification instead of a grouping when you want to:
- sort the whole model into a few named packages, such as trades, from the codes and names in its properties, with a rule for each package;
- see at a glance what no rule caught: the elements left in [UNCLASSIFIED];
- add up a quantity (an area, a volume, a length) for every bucket and take the result to Excel;
- run the same rules on the next model, or hand them to a colleague as a file.
A classification needs a loaded model and the properties its rules test. It produces a tree in the pane (the buckets, with their element counts and quantities, and [UNCLASSIFIED]), colours in the model, selection sets on request, an Excel take-off and, in the Image Report and HTML Report, one page or picture per bucket.
Where classifications are kept: for you, on your computer, one file for each classification in your Windows user profile. They are not stored in the model, so every model you open lists the same classifications, and a classification made on one model can be used on another that has the same properties. To give one to a colleague, choose Export… in the pane, send the file and let them choose Import… (see Working with the result).
The Classifications pane at a glance
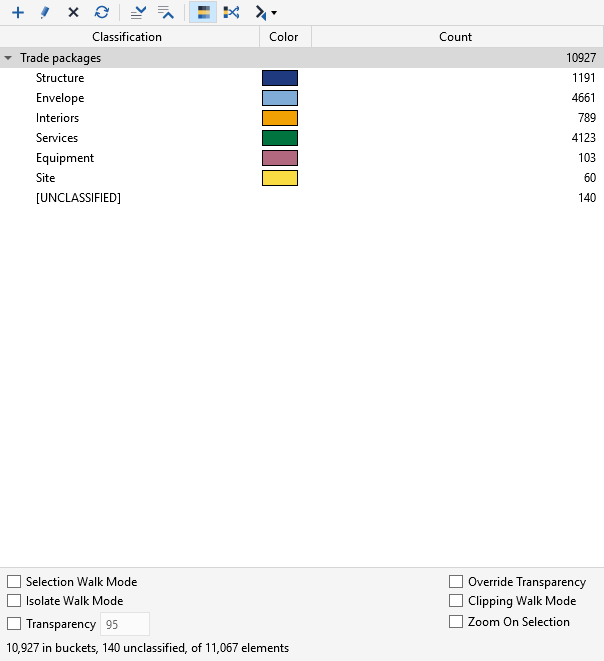
From top to bottom:
- New classification: opens the classification editor on an empty classification.
- Edit the selected classification: opens the editor on the classification you have highlighted. It is greyed out until one is highlighted. Double-clicking a classification’s row does the same.
- Delete the selected classification: asks Delete the classification ‘…’? and, on Yes, deletes it. It does not touch the model.
- Rebuild: check the model against every classification: reads the model and sorts its elements with every classification in the list. It is greyed out while the list is empty. See Rebuild below.
- Expand all / Collapse all: open or close every classification in the tree.
- Colour the model by the classification you click: a toggle, on by default. While it is on, a click on a classification paints the model in the colours of its buckets. Switching it off takes the colours off the model.
- New colours for the classification on show: gives the buckets of the classification you clicked last a new set of colours, and saves them. It is greyed out while colouring is off.
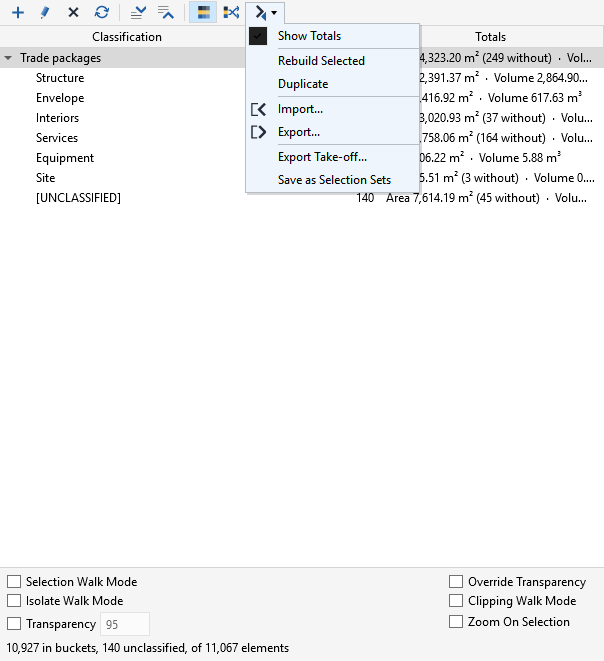
- Additional options (the drop-down at the end of the toolbar):
- Show Totals: ticks the Totals column on or off.
- Rebuild Selected: rebuilds only the highlighted classifications.
- Duplicate: copies the highlighted classification under a new name.
- Import… and Export…: bring classifications in from files and save the highlighted one to a file.
- Export Take-off…: writes the counts and totals to an Excel workbook.
- Save as Selection Sets: saves the buckets of the highlighted classification as selection sets.
- Classification tree with four columns:
- Classification: a classification per root, sorted by name, with its buckets below it in priority order and [UNCLASSIFIED] last. A classification whose rules were changed after the last Rebuild is marked (edited).
- Color: the colour of a bucket. Click the swatch to choose another colour for it; the choice is saved with the classification. A classification’s own row and [UNCLASSIFIED] have no swatch.
- Count: for a classification, the elements that are in one of its buckets; for a bucket, its elements. Nothing is shown before the first Rebuild.
- Totals: the quantities of the row, for example Area 12,391.37 m² · Volume 2,864.90 m³. It is hidden until you tick Show Totals. See Totals below.
- Walk mode options, as in the Group Elements pane: Selection Walk Mode, Isolate Walk Mode, Transparency with its number box, Override Transparency, Clipping Walk Mode and Zoom On Selection. A click on a bucket applies them to its elements; a click on a classification’s row applies them to all its groups, [UNCLASSIFIED] included. Nothing happens for a classification that has not been rebuilt.
- The status line at the bottom: with nothing highlighted, No classifications yet. New creates one., or how many classifications there are and that Rebuild checks the model. With a classification highlighted, Not checked yet. Rebuild checks the model. before its first Rebuild, otherwise its counts, for example 10,927 in buckets, 140 unclassified, of 11,067 elements, followed by excluded and out of scope counts when there are any, and Edited since the last Rebuild. in front when its rules have changed.
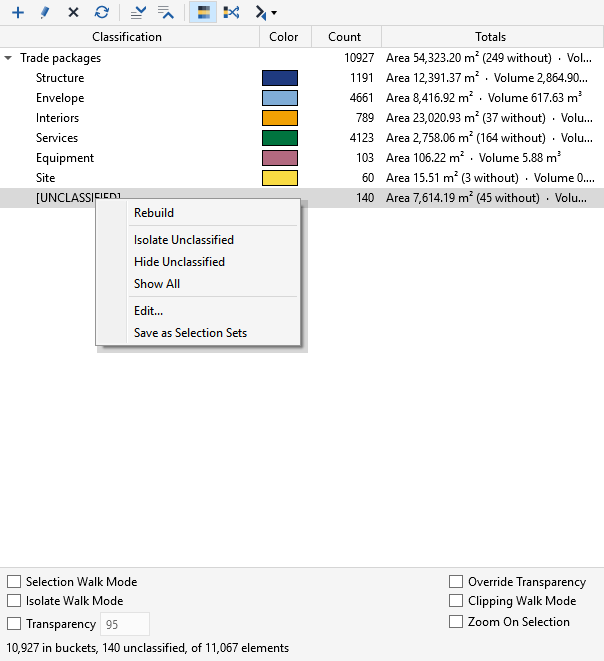
Right-click a classification or a bucket to open the row menu. It acts on the highlighted classifications.
- Rebuild: rebuilds the highlighted classifications.
- Isolate Unclassified: shows only the elements no bucket took. It is greyed out for a classification that has not been rebuilt.
- Hide Unclassified: hides those elements.
- Show All: unhides everything.
- Edit…: opens the editor. It is greyed out when more than one classification is highlighted.
- Save as Selection Sets: the same command as in the Additional options menu.
The classification editor
New classification and Edit the selected classification open the editor, a dialog titled Classification in five steps: Basics, Properties, Buckets, Quantities and Review. The steps are in a bar along the top, each with a line under its name that says where it stands: the classification’s name, 3 properties, 6 buckets, Area, Volume (or Count only) and 99% classified. A step that still needs something is marked.
A new classification starts on Basics and you walk through the steps. In the bar you can always go back; you can go forward only to a step you have been to, and not past a step that is not finished. A classification that already exists opens on Buckets, and every step can be reached at once.
The same footer is under every step:
- On the left, the hint that says why you cannot go on, if that is so, and a line of live counts for the work in progress: 10,927 in buckets, 140 unclassified, 0 excluded, of 11,067 elements. It counts the elements of the scope you chose, and counts again as you edit.
- Cancel closes the editor. If you changed something it asks Discard the changes to this classification? first.
- Back goes to the step before.
- Next: … goes to the next step and says which one. On Review it is replaced by Save; for a classification that exists, Save is there on every step.
Save stores the classification and closes the editor, and the pane lists it and highlights it. It refuses a classification without a name (Give the classification a name.), with the same name as another one (You already have a classification named ‘…’.) or with a bucket that has a problem, and takes you to the step to put it right. A saved classification waits for Rebuild before the pane shows what it finds.
Basics
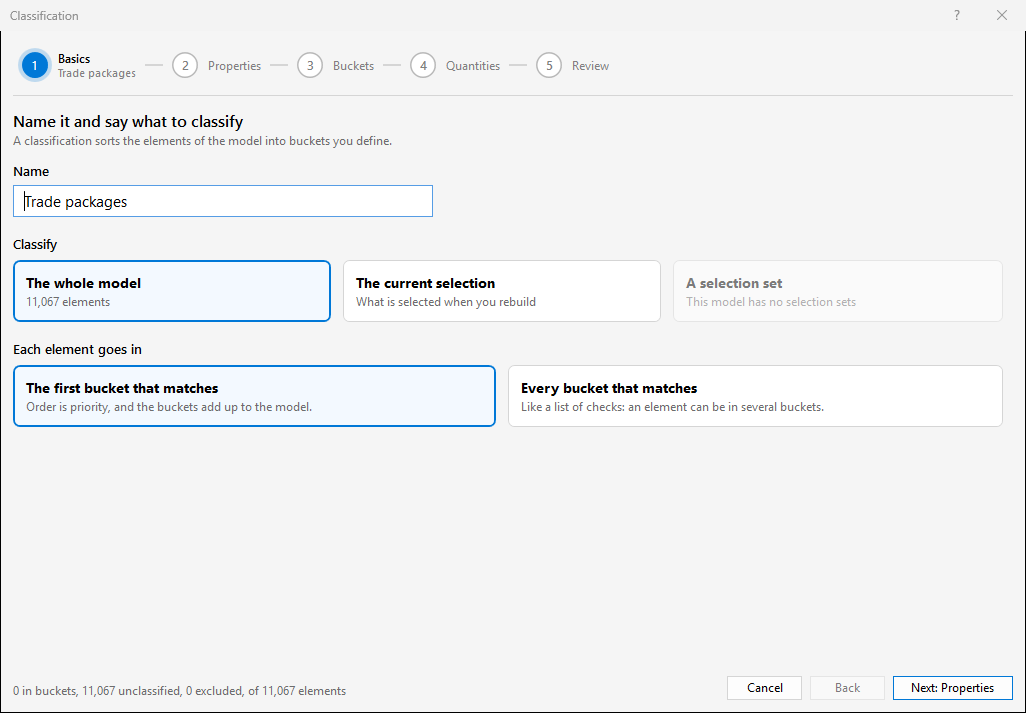
- Name: what the classification is called in the pane and in the reports. You cannot leave the step without one (Give the classification a name to go on.).
- Classify chooses which elements are sorted. The line under a card says how many elements the chosen one holds.
- The whole model: every element of the model.
- The current selection: what is selected when you press Rebuild, not what is selected now. Everything else is left out.
- A selection set: the elements of one selection set. The drop-down that appears under the cards lists the sets as Folder / Name. The card is greyed out when the model has no selection sets.
- Each element goes in chooses what happens when an element fits more than one bucket.
- The first bucket that matches: the buckets are tried from the top and the element goes in the first one it fits, so their order is their priority, and the buckets add up to the model. This is the usual choice.
- Every bucket that matches: the element counts in each bucket it fits, like a list of checks, so a wall that fails two checks shows under both. The buckets’ counts and totals then do not add up to the model, and an element in several buckets is painted in the colour of the last of them; the editor says so under the cards. An excluded bucket that matches takes the element out of all the others.
Properties
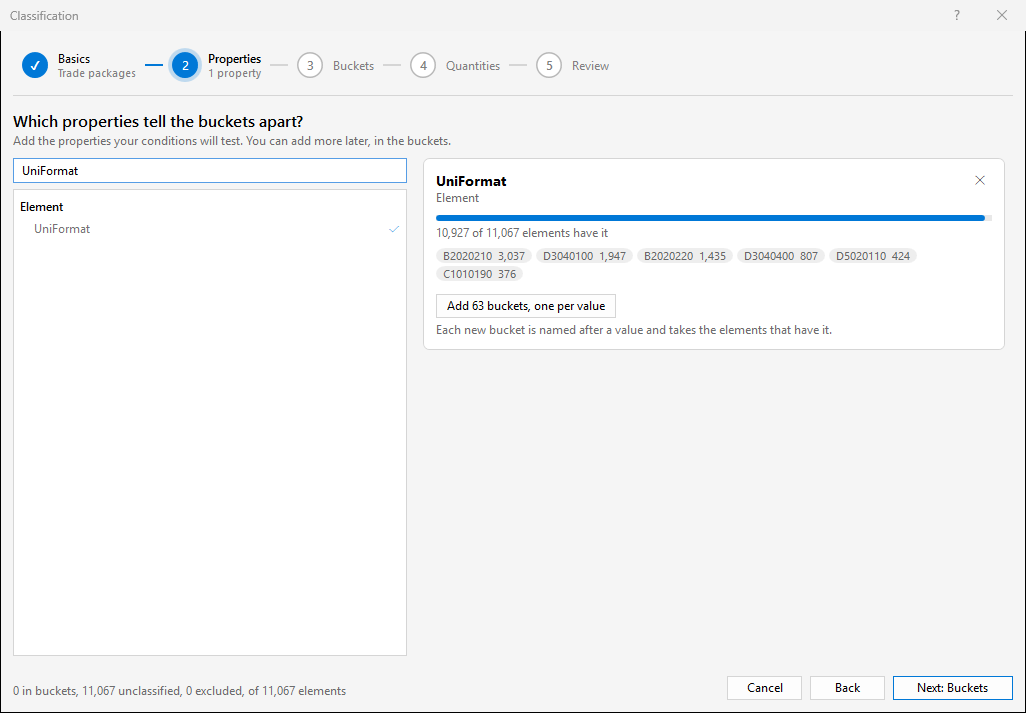
The step asks Which properties tell the buckets apart? You list the properties your rules will test; you can add more later, while you write the buckets. You cannot leave the step with none (Choose at least one property to go on.).
- The search box above the list narrows it. It matches the category and the property name.
- The list shows every property of the model under its category. Click a property to choose it. A chosen property shows a tick and is greyed out. When the list is longer than 300 properties it ends with … and N more: type to narrow. At an Element Resolution other than Default, every property carries a mark and a percentage that say where it sits (see Properties above and below the elements in Element Resolution, in the Group Elements chapter).
- Every chosen property gets a card on the right: its name and category, a bar and 10,927 of 11,067 elements have it, and its most common values with their counts. A value in italics, [MIXED], stands for the elements that have no value themselves and whose parts hold different ones (see Element Resolution in the Group Elements chapter). The cross on the card takes the property off the list; it refuses when a bucket’s condition uses it (A bucket’s condition uses this property. Remove the condition first.).
- The button on the card, for example Add 63 buckets, one per value, makes a bucket for every value of the property that has none yet. See The quick way: one bucket per value.
Buckets
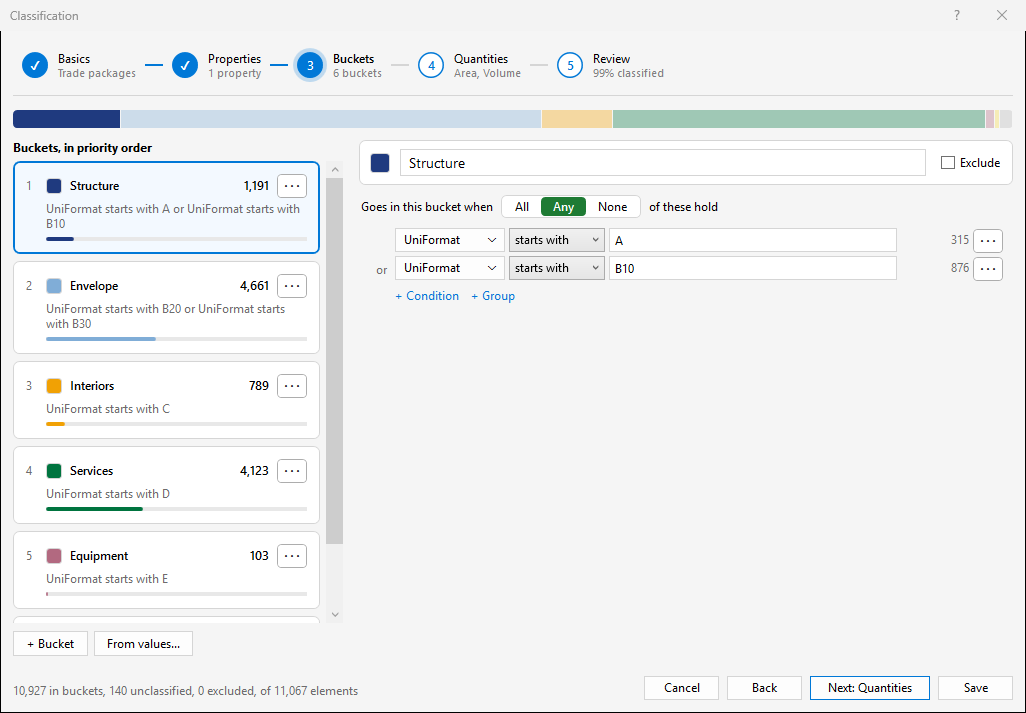
This is where you write the rules. The bar above the two halves shows where the elements of the scope go: a segment per bucket in the bucket’s colour, as wide as its share, and grey for [UNCLASSIFIED]. Point at a segment to read its name and count; click it to go to its bucket.
On the left, Buckets, in priority order lists one card per bucket:
- the number of the bucket, its colour swatch (click it to choose another colour), its name, the number of elements it takes, the … button, the bucket’s conditions as a sentence and a bar with its share;
- a label excluded when the bucket is excluded, and needs attention when it cannot be saved yet: it has no name, another bucket has its name, or it has no conditions.
Click a card to work on its bucket. To change a bucket’s priority, drag its card up or down (a line shows where it will land), choose Move up, Move down or Move to top in its … menu, or press Ctrl and the up or down arrow on the card. Enter or F2 on a card puts the cursor in the name. The order matters with The first bucket that matches: an element goes to the highest bucket that fits.
The … button of a card opens a menu:
- Duplicate: copies the bucket right below it, under a new name.
- Exclude from the totals / Include in the totals: the same as the Exclude box on the right.
- Move up, Move down, Move to top.
- Remove.
Under the cards:
- + Bucket adds an empty bucket called New bucket at the end and puts the cursor in its name.
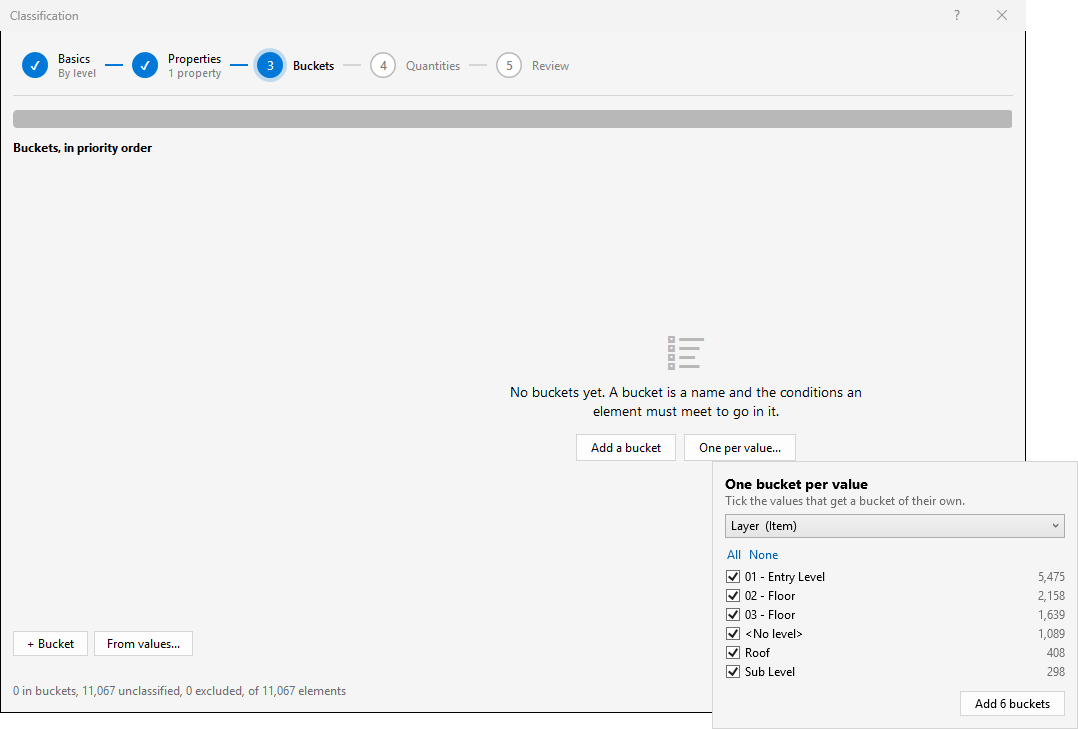
- From values… opens a panel that makes a bucket for each of the values you tick: One bucket per value. It has a drop-down of the properties you chose, All and None links, a check box with the count for every value, and a button that says how many buckets it adds, for example Add 6 buckets. A property with more than 50 values starts with every value unticked, and [MIXED] is never ticked. With no property chosen yet it tells you to choose one in the Properties step first.
- With no buckets at all, the right half says No buckets yet. and offers Add a bucket and One per value…, which do the same.
On the right, the bucket you clicked:
- Its colour swatch and its name box. The cards and the bar follow as you type.
- Exclude: an excluded bucket takes its elements out of the tree and out of the totals. They are still counted in the editor, with the label excluded. Use it for elements that should not count, such as temporary ones.
- The condition builder, described next.
The condition builder
A bucket’s rule reads like a sentence: Goes in this bucket when All, Any or None of these hold, followed by the conditions.
- All, Any and None are three buttons. All: every condition must hold. Any: one is enough. None: no condition may hold. Between the rows the builder writes and, or or nor to match.
- Each row is one condition: a property, an operator and a value. On the right of the row is the number of elements that condition matches on its own, whatever the other conditions and buckets do. A row that cannot work yet shows a ! instead, and pointing at it says why.
- + Condition adds a row to the group. It starts with the property of the row above, or with the first property you chose. + Group adds a group inside the group, with its own All, Any or None, so you can mix them: this and (that or that). A group inside another is drawn in a box with a coloured edge, blue for All, green for Any and red for None.
- The … button of a row opens a menu: Move up, Move down, Move into the group above, Move out of this group, Duplicate and Remove. In the same way … on a box moves, duplicates or removes the whole group.
- In a bucket without conditions the builder says No conditions yet: nothing goes in this bucket. and offers + Add a condition. A bucket without conditions takes nothing.
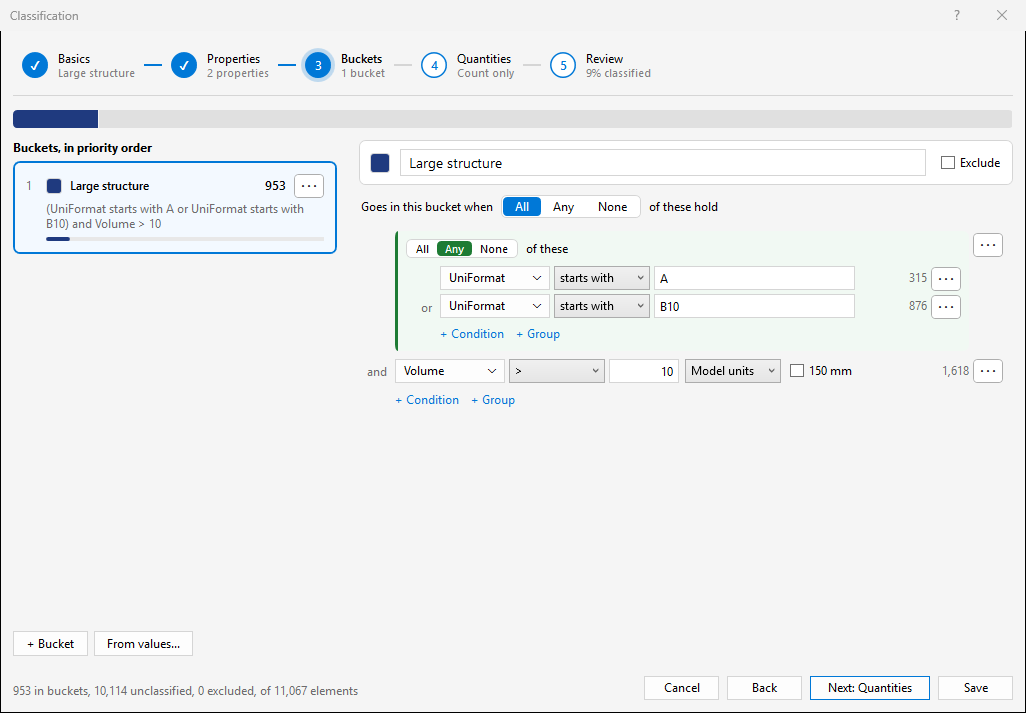
The property button of a row opens a list: a search box (Search properties), the properties already in use first, with the share of elements that have each and their most common value, then every property of the model by category. The operator list has three groups, whatever the property:
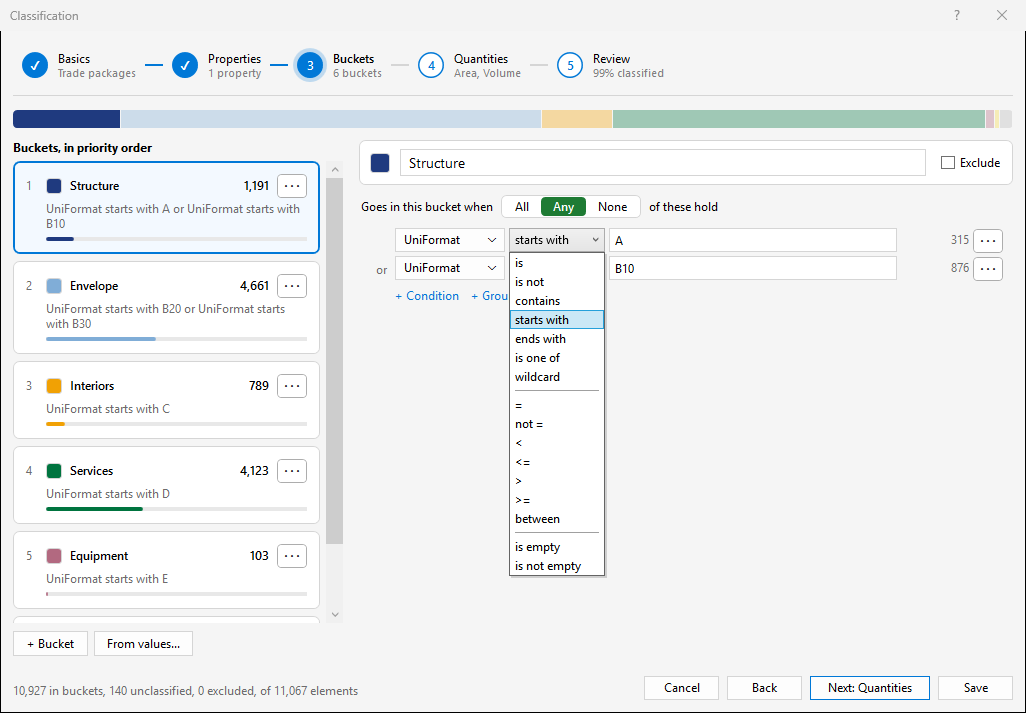
- For text: is, is not, contains, starts with, ends with, is one of and wildcard, where
*stands for any text and?for one character, soB*matches B2010 and B1010. Letter case is ignored. - For numbers: =, not =, <, <=, >, >= and between, whose two ends are both included. A number is compared to four decimals. A value stored as text is compared too when the whole of it reads as a number, such as 150; text with anything else in it, such as 150 mm, is compared only with the 150 mm box ticked (see below).
- For presence: is empty and is not empty, which test whether the element has the property at all.
A new condition starts with > on a property whose values are mostly numbers and with is on any other.
What you type for the value depends on the operator:
- With a text operator, a box. As you type, the model’s own values that match are offered with their counts; click one, or press the down arrow and Enter.
- With is one of, a row of values, each with a cross to take it off, and Add values, which opens a checklist of the model’s values with a search box (Search, or type a value and press Enter). Typing a value the model does not have adds it all the same.
- With a number operator, a number box, a unit list and a 150 mm tick box. The unit list starts at Model units; pick a unit and the number is read in it and converted for every element, so 2 m matches a value of 2000 mm. 150 mm reads the number out of text such as 150 mm; the unit written in the text is not read, so 150 is compared as typed. between has two boxes joined by to.
- With is empty and is not empty, nothing.
Two things to know about the operators. Only is empty matches an element that lacks the property or has it blank: every other operator needs a value to test, is not included. To say anything but this, or nothing, put the condition in a None group. A number operator matches numbers only, so text that is no number matches neither = nor not =.
Quantities
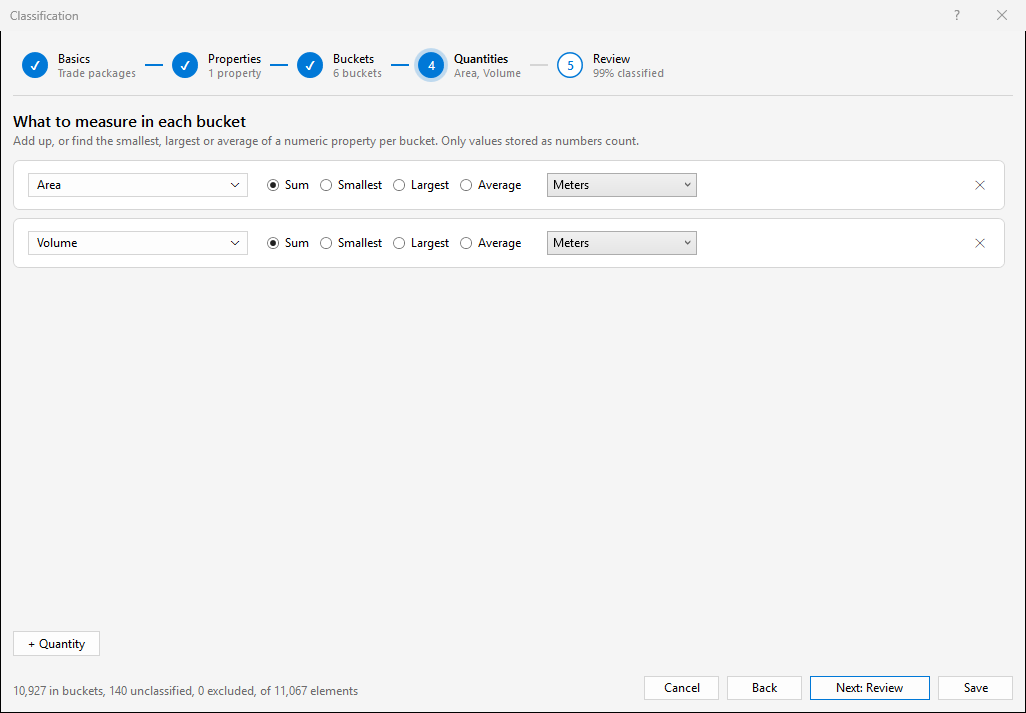
The step asks What to measure in each bucket: add up, or find the smallest, largest or average of a numeric property in every bucket. Only values stored as numbers count, as in the QTO Report; text such as 150 mm does not. With nothing added the buckets only count elements (Nothing measured: the buckets only count elements.), and that is a fine classification.
- + Quantity adds a row, with Area when the model has it. Several quantities can be measured at once.
- The property button of a row chooses the property to measure.
- Sum, Smallest, Largest and Average choose how the values of a bucket are combined.
- The unit list chooses the unit lengths, areas and volumes are shown in. Model units keeps the unit of the model; a unit converts every value by its own dimension, so a length in metres, an area in square metres and a volume in cubic metres. A number without a unit stays as it is.
- The cross stops measuring that quantity.
A quantity adds up what each element has itself, even at an Element Resolution where conditions read values from around the element: the weight of a pipe is not counted again for each of its fittings (see Element Resolution in the Group Elements chapter). Where an element has no number in the property, the bucket says how many were left out, for example Area 23,020.93 m² (37 without).
Review
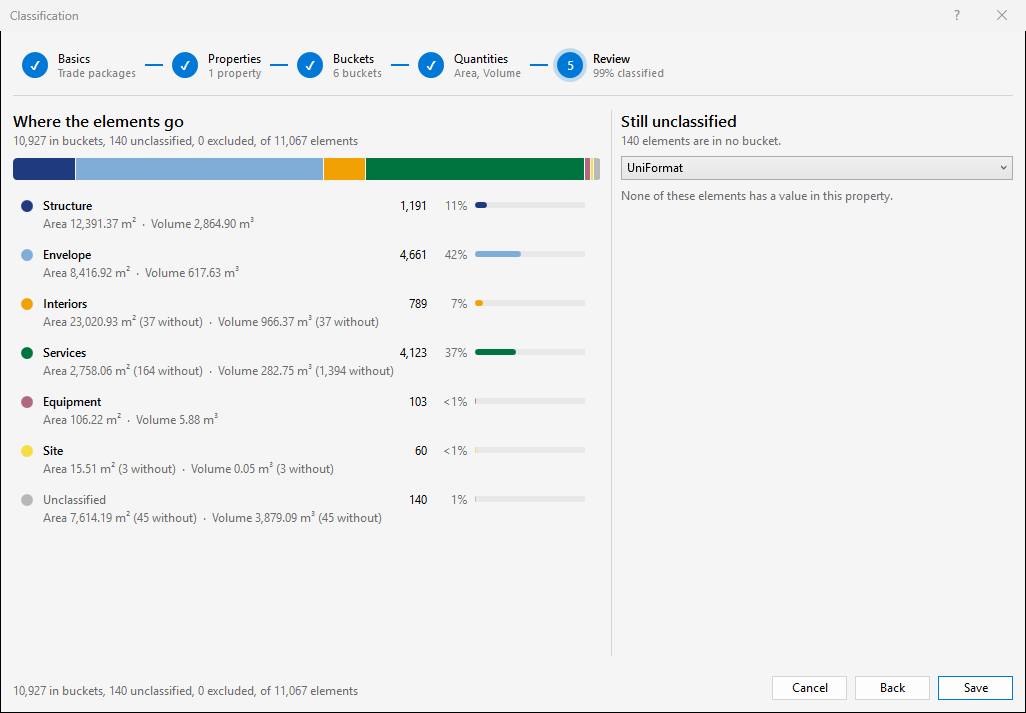
The step is titled Where the elements go. On the left the line of counts and the bar are what the Buckets step has, and under them is a row for every bucket in priority order and one for Unclassified: its colour, its number of elements, its share of the scope (a share reads 100% only when it is every element and 0% only when it is none), a small bar and, under the name, the totals of the bucket’s quantities. Labels point out a bucket that is excluded, one that catches nothing (look at its conditions, or at the buckets above it) and one that needs attention. Click a row, or a segment of the bar, to go to that bucket in the Buckets step.
On the right, Still unclassified is about the elements no bucket took: 140 elements are in no bucket. Choose a property in the drop-down and the box lists its most common values among those elements, with their counts. + bucket next to a value adds a bucket for it and counts again. A value shown as (empty) cannot get a bucket this way, since there is nothing to test. When every element is in a bucket the box says Everything is in a bucket. When none of the leftover elements has a value in the property, it says None of these elements has a value in this property.; choose another property to look for the reason.
Making Trade packages
This example sorts the demo model by UniFormat, the classification code of its elements, into packages. UniFormat starts with a letter for the major group: A for the substructure, B for the shell (B10 the superstructure, B20 the exterior enclosure, B30 the roof), C for the interiors, D for the services, E for equipment and furnishings and G for the site.
-
Open the demo model and click Classifications on the ribbon. Click New classification.
-
On Basics, type Trade packages in Name. Leave The whole model and The first bucket that matches as they are; the card says 11,067 elements. Click Next: Properties.
-
Type UniFormat in the search box and click UniFormat under Element. Its card says 10,927 of 11,067 elements have it: 140 elements have no UniFormat code at all. It offers Add 63 buckets, one per value; do not press it for this classification, since 63 codes are finer than the packages you want. Click Next: Buckets.
-
Click + Bucket, type Structure in the name box and click + Add a condition. Choose starts with in the operator list and type A in the value box. Click + Condition, choose starts with again and type B10. Click Any in Goes in this bucket when: the two rows count 315 and 876 elements, and the card takes 1,191.
-
Add the other five buckets in the same way, each with its name and its condition, and leave All where there is one condition:
- Envelope: Any of starts with B20 and starts with B30 (4,661 elements);
- Interiors: starts with C (789);
- Services: starts with D (4,123);
- Equipment: starts with E (103);
- Site: starts with G (60).
The footer now says 10,927 in buckets, 140 unclassified, and the Review step in the bar says 99% classified. Click Next: Quantities.
-
Click + Quantity: a row for Area appears, with Sum chosen. Choose Meters in its unit list. Click + Quantity again, click the property button of the new row, search for Volume, click Volume under Element, and choose Meters in the unit list of that row. The bar says Area, Volume. Click Next: Review.
-
On Review, read where the elements went. Envelope and Services take the most, 42% and 37%. Under Interiors, Area 23,020.93 m² (37 without) says that 37 of its 789 elements have no number in Area. The 140 elements in Unclassified have no UniFormat, so the box on the right has no values to offer. To catch them you would add a property they do have in the Properties step and a bucket for it.
-
Click Save. Trade packages is in the pane. Click Rebuild: check the model against every classification and wait for the Checking classifications progress bar. Click Expand all: the tree shows the six buckets and [UNCLASSIFIED] with their counts, and the status line, with Trade packages highlighted, says 10,927 in buckets, 140 unclassified, of 11,067 elements.
-
Click Trade packages: the model is painted in the colours of the buckets. Choose Show Totals in the Additional options menu to read the area and the volume of each bucket in the Totals column.
-
Right-click [UNCLASSIFIED] and choose Isolate Unclassified to look at the 140 elements no bucket took, then Show All.
The quick way: one bucket per value
When a property already holds the buckets you want, one per value, you do not have to write them. The demo model’s Layer is the level an element is on, and it has six values.
- Click New classification, type By level in Name and click Next: Properties.
- Type Layer in the search box and click Layer under Item. The card shows its six values and the button Add 6 buckets, one per value.
- Click the button. The card says 6 buckets added. with Undo and See them, and the button now reads Every value has its bucket. Each bucket is named after its value (01 - Entry Level, 02 - Floor, 03 - Floor, <No level>, Roof and Sub Level) and takes the elements that have it, most common value first.
- Click See them to go to the first of the new buckets in the Buckets step, or click Undo to take the six buckets off again.
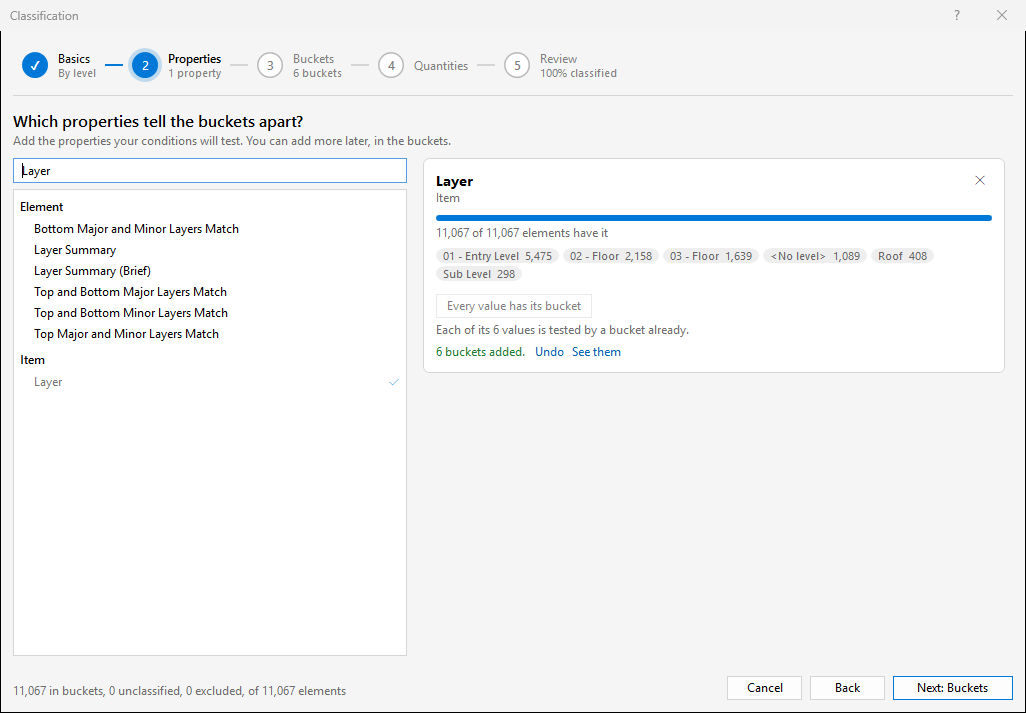
The buckets are ordinary buckets: rename, reorder, recolour or change their conditions as you like. Values that already have a bucket are skipped, so you can press the button again later after the model has new values. A property with more than 50 values first asks This property has 63 different values, which makes 63 buckets. Go on?
Working with the result
Rebuild. A classification shows nothing until it has been checked against the model, since a model is fixed in the tool that made it and checking is your call. Press Rebuild for all the classifications in the pane, or Rebuild Selected (or Rebuild in the row menu) for the highlighted ones. A progress bar, Checking classifications, reads the properties the rules need in one walk over the model, and can be cancelled: a cancelled Rebuild says Rebuild was cancelled. The classifications show what they found before. and keeps what each classification found earlier. Rebuild again:
- after you save a change to a classification. Until then its name carries (edited) and the tree shows what the old rules found. The colours you choose in the editor do reach the model at once;
- after a model is appended or unloaded, or another file is opened. What was found describes the old model, so every classification goes back to Not checked yet;
- with The current selection as the scope, whenever the selection you want sorted has changed.
Totals. A bucket’s row says what its elements add up to, for every quantity of the classification, for example Area 8,416.92 m² · Volume 617.63 m³. A quantity that is not a Sum is named, for example Area max. (37 without) counts the elements that have no number in the property. A classification’s row holds the totals of every element it kept, each once: those in its buckets and those in [UNCLASSIFIED]. So it is the total of the scope without the excluded elements, not of what was classified. Excluded buckets are not in the tree and not in the totals.
Colouring. With colouring on, clicking a classification’s row or one of its buckets paints the model. A bucket that has no colour yet takes one from a palette, and keeps it, so the same bucket has the same colour every time and in the reports. A click on a swatch chooses another colour. [UNCLASSIFIED] is not painted: it keeps the model’s own colours. Hiding the pane takes the colours off the model, and showing it again paints them back. With The first bucket that matches every element has one colour; with Every bucket that matches, where buckets share elements, the last of them wins.
Isolate Unclassified and Hide Unclassified in the row menu show or hide only the elements no bucket took, a quick way to look at what the rules miss. Show All brings everything back.
Save as Selection Sets. Saves the classification as a folder of selection sets at the top of the Sets window, named after the classification, with one set for each bucket and one for [UNCLASSIFIED]. The sets hold the elements that were in the buckets at the last Rebuild; they are not search sets, as a bucket has no single search behind it. It is available for a classification that has been rebuilt. Such a folder is what Generate Timeline takes (see Generate Timeline in the Schedule and Timeline chapter).
Export Take-off… writes the counts and totals to an Excel workbook. It exports the highlighted classifications, or every classification when none is highlighted; one that has not been rebuilt is named in a message and left out (Nothing to export yet: Rebuild checks the model first. when none is). Choose a file name (the default is Take-off) and press Save. The workbook has a sheet for each classification, named after it. A row for each bucket in priority order (an excluded one marked (excluded), with its own totals), a row for [UNCLASSIFIED], and a bold last row, Total in the tree. The columns are Bucket, Elements, then for every quantity its total, headed with its unit, for example Area (m²), and Area without value, the number of elements that had no number in it. The figures are the ones the pane shows from the last Rebuild. If the file is open in Excel the export tells you to close it or to choose another name.
Duplicate copies the highlighted classification under the name <name> copy (with a number if that is taken) and highlights the copy, for a variation on the same rules.
Export… saves the highlighted classification to a .json file named after it. Import… adds the classifications in one or several .json files. One you do not have is added. One you have, with the same rules, is left as it is; the colours do not count as a difference. One that differs from yours and has the same identity or the same name asks You already have a classification named ‘…’, and the one in this file differs from it., and Yes takes the one in the file (it replaces yours when it is the same classification and stands beside it when it only has the same name), No keeps yours and Cancel stops the import. A file that is not a classification, or comes from a newer version of the toolbox, is refused with the reason, and the other files are still imported.
Where else a classification is offered
- Image Report and HTML Report: Choose Group lists every classification that has been rebuilt after the groupings, as Trade packages (classification), with a single level; the report has one picture or page for each bucket, in the bucket’s colour, and [UNCLASSIFIED] in grey. The two buttons are enabled when there is a rebuilt classification, even with no grouping. The reports look at the classifications rebuilt in this session, whether or not the pane is open. See Image Report and HTML Report in the Reporting chapter.
- Save as Selection Sets turns a classification into selection sets,.
- QTO Report and Explode Model do not offer classifications at all, whichever way elements go in the buckets. They work on the groupings of the Group Elements pane. For a quantity take-off of a classification use Export Take-off…. Classifications also do not appear in the Group Elements pane.
Tips
- The scope is read at Rebuild. A classification made on The current selection sorts what is selected at that moment, so select first and then rebuild.
- A classification made on A selection set keeps the set’s name. On a model that does not have that set, the editor shows it as (not in this model) and the set holds no elements, so nothing is classified until you choose another set.
- A classification made on one model works on another that has the same properties. A bucket whose property the model lacks takes nothing, except through is empty or a None group, so look at the counts after the first Rebuild.
- At an Element Resolution other than Default, a condition reads a value from the item above an element when the element has none, and an element whose parts disagree has the value [MIXED] (see Properties above and below the elements in Element Resolution, in the Group Elements chapter). A condition can test [MIXED] like any text, but One bucket per value and From values… make no bucket for it. On a model without element IDs, choose Last Object or Geometry first, or the classification finds no elements.
- With The first bucket that matches, put the narrow buckets above the wide ones: an element goes to the highest bucket that fits.
- An excluded bucket is for taking elements out of the tree and the totals. The editor still counts them, with the label excluded.
- The Totals column and the take-off need quantities; add them in the Quantities step and rebuild.
- Classifications are saved as soon as you press Save; there is no separate save. Delete the selected classification removes the saved classification for good, so export it first if you may want it back.
Something unclear or out of date in this chapter? Write to [email protected].